
Emailing Document Types
What are Document Types?
It is possible to define the email addresses that specific PDF reports will be emailed to. Multiple email addresses can be set up using this method enabling Khaos Control to send a document to different email addresses.
The following documents can have email addresses set against them in the Company Email Addresses Dialog:
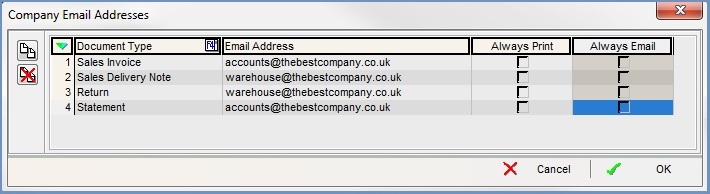
- Sales Invoice
- Sales Delivery Note
- Return
- Statement
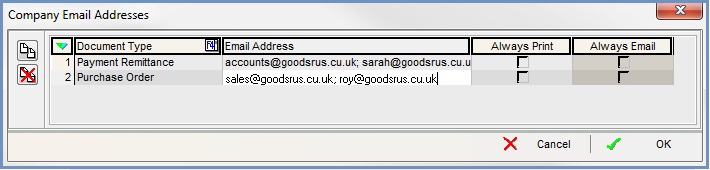
- Payment Remittance
- Purchase Order
These email addresses supersede any email addresses setup in the [ Customer | Detail | Address ] tab for both the contact and the address emails, see How To: Understand which email address the system will use.
What are Benefits of Using Emailing Document Types?
- The main benefit of setting email addresses against document types is that the document will always be emailed directly to the specified individual or group, for example the accounts department.
- Emailing documents has big cost saving implications too, for example customer statements can be printed and emailed saving the cost of envelopes, postage, printing and the time taken to put paper statements in envelopes.
- The customer will receive their statement much quicker and, if the email message template has been setup to add an entry in the customer's Comm Log, then the user can see if they have been sent a statement.
Where is the Company Email Addresses Dialog Accessed From
To open the Company Email Addresses dialog:
- Open a Customer screen.
- In the
[ Customer | Detail | General ]screen click on the rollover button in the middle of the screen.
 - Click on the
 button.
The Company Email Addresses Dialog
 Customers
 Suppliers
Action Buttons
-
 : add a new line to the grid.
 -
 : delete the line currently focused on in the grid, else if green selected all green selected lines.
Grid
- Document Type: use the F4 key to select one of the following document types:
- Sales Invoice
- Sales Delivery Note
- Return
- Statement
- Payment Remittance
- Purchase Order
- Email Address: the email address the document will be sent to.
- Always Print: stops the entry from being automatically emailed.
Notes:- In order for this option to work the
 button must be used to send the emails.
 - This checkbox is ignored by the Email Manager for Invoice Template emails.
- The invoice can be printed once the
 button in the report is used by the user at the end of the process.
- In order for this option to work the
- Always Email: when ticked will always email the specific document.
Notes:- This checkbox is only editable when the Always Print checkbox is ticked.
- If both Always Email and Always Print are ticked then the document will be included in both email and print runs for the customer.
- Despite only having Always Print ticked against an email address, when using trigger rules or the
 button an email will be sent.
Notes:
- If more than one e-mail address is set against the 'Document Type' then when documents are sent from print previews button, Khaos Control will send the document to the multiple e-mail addresses rather than be limited to one e-mail per document. This only applies to when the user manually sends e-mails from the print preview of a report and not automatically from the Email Manager.
- The setup for this is separate to the existing email addresses held against the address tab in the customer / supplier screen.
- If any of the above values are not defined against a Company, then the system will use the standard rules to decide which email address to send the document to.
- If you require that no emails are sent to your customer at all, then the company set email address (set in the
[ Customer | Detail | Address ]tab) must be left blank otherwise the system will use that address to send the email to.
How to Setup Document Types
- Open a Customer screen.
- Find and load the customer or supplier you wish to add the email address for.
- In the
[ Customer | Detail | General ]screen click on the rollover button in the middle of the screen. - Click on the button.
- Click on the button.
- Focus in the Document Type field and press F4 button.
- Select the document type, for example Payment Remittance.
- Enter the email address, for example accounts@goodsrus.co.uk.
- Repeat steps 5 to 8 as required to define further email addresses.
Note: if you want to add more than one email address per document type separate them using a semi colon ;, see image above. - Click on OK when finished.