
How To: Add a Courier Note to a Picking Ticket / Despatch Note on a Basic Report
| | Basic Reports Setup is an Advanced User feature. |
- WARNING: Prior to amending a basic report, please take a backup of the .rtm file on the server first so that you can roll back to this if required.
It is possible to add the courier note into a Picking Ticket / Despatch Note Report, for example so it can be printed on a peel off label.
- Follow the menu route
[ System Operations | Basic Reports Setup ]to open the 'Basic Reports Setup' dialog. - Double-click on 'Picking Ticket / Despatch Note Report'.
- Press the
 button to open the Design tab.
Note: select the brand if one has been setup before using the Design button. - Click on the
 button on the Data Components toolbar at the top.
 - Click in the footer area to add the DBText field.
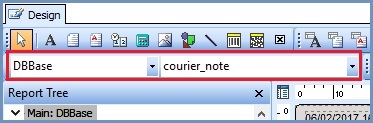
- Make sure the DataPipeline is set to DBBase in the area at the top of the screen and from the drop-down to the left select courier_note.
 .
.
Note: you can also set this using the Object Inspector bar on the left. If the Object Inspector pane is not visible right click anywhere under the Report Tree (usually on the left side) and select it from the Context Menu. - Set or match the size and fonts as desired in the Layout and Text areas on the left.
- Once complete save the report template changes by using the menu option
[ File | Save ].
Note: the courier note associated with the sales order will always print on the Picking Ticket when this field is defined. This can be controlled by using branding to control whether or not this information is printed on the report or not.