How To: Create a Shipment Schedule from a Sales Order
in a saved Sales Order, green-select the line(s) you wish to add to the shipment schedule. Note: if no items are selected, all lines will be added to the shipment schedule.
Press F9 or clicking the down arrow immediately to the right of the to open the 'Other Actions' menu.
Click on option 5 Shipment Schedule or press 5 if you used F9.
Click yes to the message Transfer selected data from sales order to a new scheduled shipping plan?
Click yes to the message No item selected, process all rows?
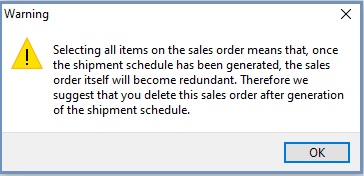
Click OK in the warning message:
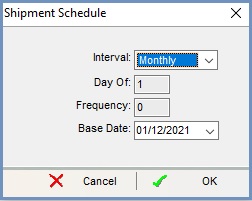
In the dialog, select the following options:
Interval: the interval between each shipment item.
Day Of: the day of the month to be used if the interval is set to Monthly.
Frequency: the number of shipments to be generated.
Base Date: the date after which the first item(s) will be shipped.
Click on OK.
Say Yes to the 'Would you like to be taken to the Shipment Form?' popup.
Note that the shipment is already saved and active.
Notes:
If multiple items are added from a Sales Order, the first item will be added to the shipment, with the remaining items added as attachments.
Just like manually created shipments, shipments created from sales Orders do not have an originating subscription, so there is nothing for other customers to 'join'. It is a one-off from the customer's sales order but it can be edited and added to.

 to open the 'Other Actions' menu.