
How To: Enter a Supplier Credit Note for an EU Supplier
- WARNING: SP Ledger Supplier Credit should NOT be used if stock is being returned if this is the case Supplier Returns should be used.
The SP Ledger is used to enter payments made for miscellaneous expenses, such as utility bills, petty cash items (e.g. stationery, etc); it can also be used to enter non-stock related credit notes for a supplier (e.g. brokerage andpromotional allowances).
The following describes the process required so that the credit note entered for an EU supplier appears in the EC Tax Register grid in the [ Accounts | Tax (VAT) | Tax Register ] screen.
Prerequisites
The following options must be setup against the company beforehand in the Base Options area in the [ Customer | Detail | General ] screen:
- Tax Ref: the tax reference must be entered
- Supplier: ticked
- EC company: ticked
- Company pays tax: ticked
Adding the SPLedger Entry
- Open an Accounts screen.
- Open the
[ SP Ledger ]tab. - Press Alt+E or click
 to enter edit mode.
 - Press F3 or click
 to add a new item.
 - Use the Lookup dialog box to locate the supplier that you wish to post an invoice transaction against. A new row is added to the grid for the selected supplier.
- The following SP Ledger options must be set:
- Post: if this checkbox is:
- TICKED (default): If you have already received the Supplier Credit note.
- UNTICKED: If you have not yet received the supplier credit note and allows the transaction to be posted later.
- Pay: this option must not be ticked.
- Crd: must be TICKED as this will mark the SP Ledger entry as a Supplier Credit.
- S/P: must be set to P to indicate a Purchase ledger entry.
- Conversion Rate: change the conversion rate if required (Optional).
- N/C: nominal account to post entry against.
- InvRef: the supplier's invoice reference.
- InvDate: the date of the invoice.
Note: if the invoice date is today's date then a warning message will appear. - Net: enter the Net amount.
- Tax: make sure this is 0.00.
- TaxRt: should be Exempt.
- EC Tax: enter the amount of EC Tax.
- Description: used to describe what the invoice was for (Optional).
- Status Note: can be used to track invoices that require approval from various departments prior to posting (Optional).
- Post: if this checkbox is:
- Press Ctrl+S or click
 to save the transaction.
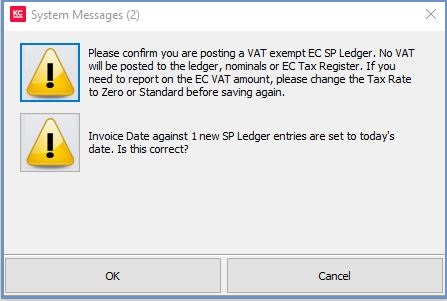
- If you are happy to post the transaction with no VAT, acknowledge the EC Vat Amount warning message.
- If the credit for today's date, acknowledge the warning message.
- Click on OK in the Information popup.
- Click on OK to the Information popup showing the SPLedger number.