
How To: Setup Stock Location Types
- Open a System Data screen.
- Double-click on 'Stock/Stock Location Types' to open.
- Press Alt+E or click
 to enter edit mode.
 - Press F3 or click
 to add a new item.
 - Enter the stock location's description.
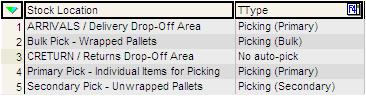
- Press F4 to add the System Picking Priority as shown in the screenshot below:
- Picking (Primary)
- Picking (Secondary)
- Picking (Bulk)
- Put away (Bulk)
- No auto-pick
- Press Ctrl+S or click
 to save the locations.
 - Ctrl+A to close all open screens.
For more information on the picking location hierarchy see Stock Pick and Replenish Hierarchy.