Staged Processing Grid
For the Other Action Menu options (press F9 or  ) see Sales Invoice Other Actions Menu.
 Grid Configuration
The Staged Processing Grid displays orders that are in the stage the user is focused on in the stages pane depending on the currently active filters. For information on processing orders and other options in the Sales Invoice manager see How To: Sales Invoice and for PayPal orders see How To: Setup, record and process Manual PayPal payments for PayPal payments that have been taken via eBay or on your website then these will be handled just like any other sales order in the system once they have been setup, see the PayPal page.

Grid
The grid column headings are:
- ! (Invoice Priority): if a sales order has an invoice priority set against it, the mark associated with that invoice priority will be displayed here. Invoice priorities are setup in
[ System Data | Invoice Priorities ]and are defined against sales orders in[ Sales Orders | Details | Additional Inv. Priority ].
Note: if an invoice priority is set to be highlighted in system data, the mark in the sales invoice will be displayed in bold red, if highlight is not set then it will be in standard black text. - BO (Back Order)
- Unticked: indicates that this is the first time the order has passed through the Sales Invoice Manager
- Ticked: indicates that this is the Back Order or subsequent part of an order, remember to note the Fulfilment percentage (%).
- Note: double-clicking on the Notes column will display a dialog with all of the notes relating to the selected Invoice line.
- Unticked: there are no Delivery, Picking, Return or Invoice notes recorded against this order.
- Ticked: a Delivery, Picking, Return or Invoice note is recorded against this order.
- Paid: indicates the payment status of an item:
- Unticked: the order has not been fully paid.
- Ticked: the order has been fully paid.
Notes:- Khaos Control treats Account Orders as being fully paid.
- Statement payments that are linked to multiple invoices have the potential to cause false positives with regards to the new paid flag, as amendments to the statement payment allocations after it has been associated with the sales order will not update the flag.
- Marking a sales order as paid does NOT release it from the future stage it is currently in. Likewise, orders that are NOT marked as fully paid may still be released from the future stage they are currently in if their delivery date / stock / other criteria meet the currently defined invoice rules.
- If more than one invoice is generated for a sales order then:
- 1st invoice: if the sales order paid amount => invoice amount, then display as paid, otherwise display as not paid.
- 2nd and subsequent invoices: if the sales order paid amount => invoice amount + previous invoice(s) amounts, then display as paid, otherwise display as not paid.
- If the System Values option 'Cheque / BACS Authorisation Required' (located within the Sales / Invoice Management section of the
[ System Values | Sales | Invoice Management]dialog) is enabled and a Cheque / BACS payment has not been authorised, the Sales Order will display the paid amount according to the value against the Cheque / BACS payment regardless of authorisation status but will only display as and be treated as 'Paid' within the Sales Invoice Manager once the payment has been authorised as required.
- References
- Invoice: displays the system generated invoice number for the order populating that line. A number will only be generated if the invoice has been printed (either to the printer or PDF). Before it has been printed the invoice cell will display the questions marks ??? informing the user that no invoice has been printed yet.
Note: the invoice reference can be generated on saving a new sales order. This functionality is project specific and is turned on by Khaos Control Solutions Ltd if required. - SOrder: displays the system generated sales order reference number for the order populating that line.
Note: In the case of returns, Credit Notes will use the SOrder number of the sales order that it was created from. - Associated: the associated Reference from the sales order, for channel orders this will indicate the channel the order has been imported from as normally as part of the channel setup and prefix to indicate the channel is added and this will be seen here.
- PO#: displays the purchase order number as entered against the sales order in the
[ Sales Orders | Details | Additional ]tab. This can be filtered for using the PO filter above the grid.
- Invoice: displays the system generated invoice number for the order populating that line. A number will only be generated if the invoice has been printed (either to the printer or PDF). Before it has been printed the invoice cell will display the questions marks ??? informing the user that no invoice has been printed yet.
- Customer
- URN: displays the customer unique reference number for the order on that line.
- Name: displays the customers or companies name for the order on that line.
- Postcode: the Delivery Address postcode.
- Invoice Details
- Type: displays the code for the order on that line, the list of codes is as follows:
- S: Sales Order
- PF: ProForma
- C: Credit
- QU: Quotation
- RE: Return Exchange
- RC: Return Credit
- E: prefix EPOS orders
- Value: is the sales order total of the currently assigned items including delivery.
- Fulfill %: is the invoice fulfilment expressed as a percent of stock items assigned against stock items sold on the sales invoice. For example a sales invoice with 2 items sold on it but only 1 in stock and assigned to it, it would have a fulfilment percentage of 50. A sales invoice with 3 items sold on it but only 2 in stock and assigned to it, would have a fulfilment percentage of 66 as so on.
- Qty: is the total amount of assigned items for that order.
- Physical Qty: this displays the physical quantity on the order and doesn't include non-physical stock items. This is not enabled by default, please email Development if you want this option enabled.
- Lines: displays the number of lines on the current invoice.
- Copies: displays how many copies of the customers invoice are to be printed. This number is defined in
[ Customer | Details | Financial Inv Copies ]but can also be edited via the grid menu using the 'Change Number Of Copies' option. - User: displays the name of the user who created the order on that line.
- Type: displays the code for the order on that line, the list of codes is as follows:
- Dates
- Order: this displays the date the order was created on. This field can be change by the user on the [Sales Orders | Detail | Main] tab
- Time: this displays the exact time the
- Delivery: is the delivery date set against the order on that line.
Note: delivery date can be set manually by the user although can be set be the order payment type, for example cheques by default add seven day to the delivery date to allow them to clear. - Invoice: this displays the date the invoice date. This can be set as the delivery date, the shipping date, or the date the invoice was printed. This is controlled in [System Operations | Edit System Values | Options | Invoice Management] by selecting an option from the 'Invoice Date Basis' drop-down.
- Ship: if populated displays the date the order, or part order was dispatched to the customer. This is done when the order is processed through Confirm Shipment.
- Issue: is the date the order was issued to the system. This field will only be populated whose orders are in the Issued stages in the stages pane.
- Currency: this displays the currency of the order.
- Exptd: this flags when orders have been exported to certain couriers, for example Metapack.
- Collect: used for sales orders using eBay's Global Shipping Program (GSP). If the imported Sales Order has a 'Ship To Address' then this checkbox will be ticked. This option must be enabled, please email Development.
The following columns can be added into the grid using Grid Configuration. They are hidden by default. Please see Grid Configuration for more details:
- Net Amount: the invoice net amount including the net delivery and any discounts applied. This is only for the items being shipped.
- Required Date: the Required Date from the
[ Sales Order | Additional ]screen. - Pick D/T (Combined): if the printing of a Pick Sheet (Combined) is enforced using Process Path rules, then this column will display the date and time it was printed, once the order has moved past the Picking stage.
- Pick D/T: the date and time a Pick Sheet is printed, when closing the Pick Sheet the date and time will appear in the grid.
- Act Weight: the actual weight as entered in the Shipping dialog. This will only appear once the sales order has been marked as shipped.
- Last Mv User: the name of the user who moved the invoice to another stage.
- Courier: this is the courier as set in the Shipping stage and not the courier set against the sales order.
- Move Time: the last time the invoice was moved between stages.
- Last Moved: the last date the invoice was moved between stages.
- Brand: the brand from the
[ Sales Order | Additional ]screen. - Full Value: the full order value, regardless of what items are assigned.
- CN Value: if the customer has used a credit note to pay for their sales order, this will be the total of the credit note(s).
Context Menu
- Goto Customer: opens the customer record for the order line that the user is currently focused on.
- Goto Sales Order: opens the Sales Order that relates to the line the user is currently focused on.
- Goto Return: opens the Return that is associated with only with the order type of Return Exchange (RE). The user must focus on the RE order before this context menu option will work.
- Goto Stock Assignments: opens the
[ Back Order (Stock Assignment) ]tab and filters the grid with the Sales Order reference number of the line the user was focused on in the Stage Processing Grid. - Goto Stock Assignments (Customer): opens the
[ Back Order (Stock Assignment) ]tab and filters the grid by the customer of the Sales Order number focused on in the Stage Processing Grid. - Edit Invoice Detail:
- Change Number of Copies: allows the user change the amount of invoices that will be printed. This is useful when customers request extra copies for a specific order. This updates the Copies column in the grid.
Note: if the customer always requires multiple copies of their invoice then the user can set this in[ Customer | Details | Financial ] - Inv Copies. - Change PO Reference: allows the user to change the PO reference on issues sales orders, see How To: Change the PO reference on an Issued Sales Order.
Note: this requires HQ User permission. - Other: opens the Update Invoice dialog allowing you to change the following options en-masse, see How To: Block Update the Sales Order Invoice or Delivery Date or the Invoice Priority for more details:
- Invoice Date
Note: the date popup box will be populated with the delivery date of the order the user is currently focused on. - Delivery Date
- Invoice Priority
- Invoice Date
- Change Number of Copies: allows the user change the amount of invoices that will be printed. This is useful when customers request extra copies for a specific order. This updates the Copies column in the grid.
- Copy to User Tray: Copies the orders the user is either currently focus on or has selected.
- Reapply Rules (Override Process Path Rules): reapplies invoice rules that have been created by the user then the system rules (as covered in System Values) for the stage the user is currently focused on in the stages pane.
- Recalculate Invoice Tax Rate: The system will recalculate the tax of all selected invoices within the grid.(Admin users only)
- Advanced "Issued" Menu: This flyout menu only appears in the Issued stages.
- Preauth Credit Card Orders: the user must green select the un-authorised credit card orders that they wish to pre-auth. The order line text will go from red for un-authorised credit card orders to black for pre-authed or authorised credit card orders. Pre-authed order still require fully authorising, this can be done in the Authorise Payment order process stage.
- View Boxes: opens the Box Information Dialog for the order the user is currently focused on in the grid listing the boxes and their contents for the sales order.
- View Dispatched Items: displays the Items Sent Dialog which shows how many items were sold, how much stock has been assigned so far and the quantity which has already been sent.
- View Credit Limits: opens the Credit Limit / Balance dialog allowing the user to view the credit limits for all customer's orders they have selected in a stage.
- Process and Issue (only available in the Return Stages): this option will process any green-selected Returns through all the required stages to issue the full Return and generate and issue any documents associated with the Return. The Return will be refunded from the Source Bank Account which was used for any Sales Order linked to the Return.
- Select all Direct Returns (only available in the Return Stages): any Returns where the items being returned on the Return are equal to the original Sales Order items (i.e. all items on the Sales Order are being returned and a full refund is required) will be green-selected when using this option. It can be used in conjunction with the above option to process all full refunds in a single action.
- Custom Reports
- Report Review Ctrl+P: will open the Khaos Control Report Explorer where all created report templates are stored.
Note: the user can only print report that are of the same type as the area the user wants to report on. For Example the reporting pool must be set to Invoice and only invoice template reports can be used. - Add Selection to Reporting Pool: adds the currently selected orders to the reporting pool. Orders must be added to a reporting pool before they can be reported on.
Note: the user can only print report that are of the same type as the area the user wants to report on, for Example the reporting pool must be set to Invoice and only invoice template reports can be used. - Clear Reporting Pool: clears all data from reporting pools.
- Report Designer: opens the report designer tool where the user can create new and modify current reports.
- Choose Reporting Pool Type: when the user wants to create reports based on information from a customer's order they must be put into the following pools to make sure the correct data is available to report in.
- Sales Order: Sales Order information will populate the reporting pool and only reports that use Sales Order information can be used.
- Company: Customer or Company information will populate the reporting pool and only reports that use Customer or Company information can be used.
- Invoice (default): invoice information will populate the reporting pool and only reports that use Invoice information can be used.
- Return: returns information will populate the reporting pool and only reports that use Returns information can be used.
- Report Review Ctrl+P: will open the Khaos Control Report Explorer where all created report templates are stored.
- Email
- Email (template) [Selection]: this function allows the user to send an email using a pre-defined template to multiple customers based the selection in the grid or a single customer when focused (blue background) on their order. The email can be sent immediately using the checkbox in the popup.
- Email (external) [Single]: this function opens a Microsoft Outlook email and populates the email address and subject line with the relevant email and order details. This can only be used with a focus (single customer) and not with selections (multiple customers).
- List Manager: opens the the List Manager allowing companies associated with a selection of invoices to be added to the List Manager.
Note: this option only adds the company to the list not any specific contacts which may be associated with the selected invoices. - Repick (Auto): this functionality is only usable when Warehousing is enabled and setup. Selecting Repick (Auto) with update the picking locations for the items on the sales order to those that the system thinks they should be.
Note: users will require the option Allow Repick to be ticked in[ System Data | User Permissions ]to be able to repick sales orders. - Repick (Manual): this functionality is only usable when Warehousing is enabled and setup. Selecting Repick (Manual) opens the Assign Picking Locations dialog box for the order the user is currently focused on, this gives the user the ability to assign new picking locations for all stock on the order. The full Assign Picking Locations functionality is covered in Bottom Action Pane Picking Stage.
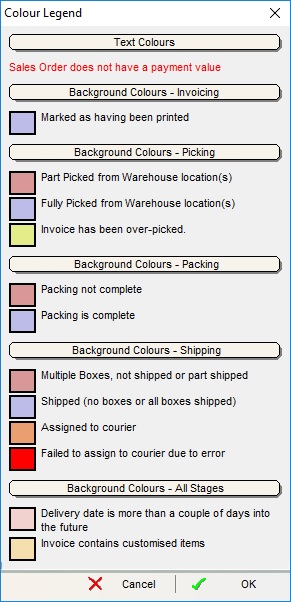
Note: users will require the option Allow Repick to be ticked in[ System Data | User Permissions ]to be able to repick sales orders. - Colour Legend: displays a colour legend for the staged processing grid, for the details of what the colour mean for each stage see below.
- Clear Selection: deselects the currently selected line(s).
Colour Legend