
Data Query
| | Data Query is an Advanced User feature. |
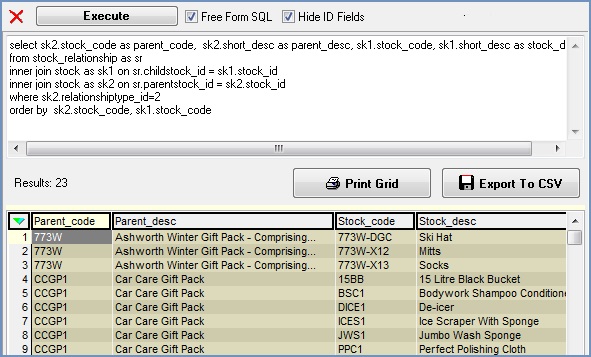
The Data Query Report window, which may also be referred to as "Report Generator", allows users to create and run ad-hoc queries against the Khaos Control database. It is opened by either:
- Typing "query" into the command window; or
- Selecting "Reports" from the window list; or
- Clicking the black and white printer icon in the menu button area
 .
.
This Khaos Control Wiki page briefly covers the features, functions and tools that the user can query the database with, including storing data queries for later use. Data Query is very much an advanced user feature and knowledge of SQL is necessary to successfully query the data held.
Notes:
- The dates returned after executing a query will be displayed based on the exact dates provided in the query.
- Editing Data Query reports will require the appropriate user permission set in
[ System Data | Others | Users ].
The Data Query Report screen
The Data Query screen is divided into five main areas:
Reports area

Action Buttons
-
 : used to populate the SQL Script Grid with the saved query. The user must focus on a query before pressing the button else nothing will be displayed.
 -
 : this button only works if there is a query in the adjacent grid to save. A Save Report popup appears enabling the user to enter a name. The user can also overwrite a previously saved report by using the dropdown box and selecting the query. Reports can be moved into a specific section which can be chosen from the dropdown box.
Note: To create a new section click on the button in the popup.
 -
 : deletes the report the user is currently focused on in the Report Pane.
Note: The system will prompt the user before deleting the report. -
 : allows the user to edit the name of the report they are currently focused on in the Report Pane.
 -
 : expands the list of reports in the Reports pane.
 -
 : collapses the list of reports in the Reports pane.
 -
 : this opens the Email Trigger dialog enabling the user to automate the running of the SQL reports and email internally or externally or upload reports to a specific FTP folder.
Reports Pane
The reports pane is used to access reports that have been saved for reuse. Within the reports pane, sections can be created and used to group and organise reports. For example:
- Address
- Address - List Addresses with Courier Note
- Address - List Deactivated Addresses
- Customer
- Customer - Company Terms NOT matching Company Class Terms
- Customer - Count Customers created on each day
- Customer - List companies having document-related email addresses
- Customer - List inactive contacts
- EPOS
- EPOS - Daily Sales Report
- Sales Orders
- Sales Orders - Countries with sales order restrictions
- Sales Orders - Summary by User
- Stock
- Stock - List initial stock levels and values
- Stock - Count Stock Items in each Category
- Stock - List stock having duplicate Other Ref
- Stock - Quarantined Items
- Stock - Stock Items where buy_price or sell_price is zero
List Pane
- List Pane: The List Pane at the bottom left hand corner of the window displays all the List Manager results. Double clicking on the list results will populate the SQL Script Grid with a query. This can then be executed and the results used for a mail merge, including some financial information. The results can then be additionally queried if required.
Scripting area
The top part of this area has a scripting pane, where users can:
- Create a new query by dragging one or more rows from the field grid into the scripting pane; or
- Directly enter a SQL query into the scripting pane (see below for examples); or
- Load a previously saved query (from the Reports Pane) into the scripting pane.
The name of the currently loaded query is displayed at the top of the Data Query window prefixed with 'Reports: '.
 : removes any text from the scripting pane.
 : attempts to run the contents of the scripting pane as a data query.
- Note: the keyboard shortcut is F5.
- Free Form SQL checkbox:
- UNTICKED: the system will NOT check the query's syntax.
- TICKED: (default) the system WILL check the query's syntax when the Execute button is pressed.
- Hide ID Fields checkbox:
- UNTICKED: ID fields will be visible in the list of fields.
- TICKED: (default) ID fields will be hidden from the list of fields.
Results
The Results area displays the total number of rows that have been returned in the grid. The following buttons allow you to export the results:
 : opens the grid menu's "Print Grid" dialog box.
 : opens the grid menu's "Send to Notepad" enabling the user to export the grid contents as a .csv file.
Some results, those with a green background, allow the user to Goto or double-click and drill down into the record. The following fields work in this way:
SORDER_IDCOMPANY_IDINVOICE_IDRETURN_ID / CRETURN_IDSTOCK_IDPORDER_IDSUPPLIER_IDDELNOTE_IDINVOICEP_IDSRETURN_IDKEYCODE_ID
Tables and Fields
Tables
The Tables grid lists the database tables that may be queried. The user can display tables by their initial character (A-Z) or all of them alphabetically (All Tables).
It is not possible, for reasons of commercial confidentiality, technical differences between platforms, and because the Khaos Control database is continually evolving as new features are added, to provide users with a copy of the database schema.
Fields
The Field grid displays the names of columns contained in the Table currently in focus. These columns can be added to a query by dragging and dropping them onto the scripting pane. If a join is required the system displays the 'Join Tables' dialog, allowing the user to specify the type of join (i.e. inner join or left join) and the field(s) to be used for the join.
Unticking the Hide ID Fields checkbox includes the hidden identity fields (commonly used to create links between tables) when listing a table's fields.
 : if a Fields field is dragged into the SQL grid, then this information will be returned on execution. Note: this depends on subsequent filtering.
 : enables the query can be sorted alpha numerically in a ascending order on execution.
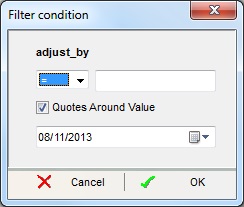
Note: the user must have selected the field before ordering it. : if a Fields field is dragged into the SQL grid, then the query can be sorted by logic using a filter condition.
- Note: The user must have selected the field before ordering it. The filter condition popup allows the user to query by date and condition. For example: less than "<", less than or equals "<=", greater than ">", etc. The default condition is equality "=". The LIKE field is used with wildcards so a string can be queried. This search is not as rigid as an 'equals to' search as it allows a range of results to be searched for anything that is defined within the wildcards. For example; %hotmail% would return any results where the queried field contained 'hotmail', this could be useful in this example as it would return email address like 'example@hotmail.co.uk' and 'example@hotmail.com', etc.