How To: Email a Customer with their Unique Alias Offer Code
Once you have setup your Alias Keycodes and automatically generated them, see How To: Automatically Generate Unique Alias Codes for Customers you need to let your customers know what their offer codes are so that they can use them. First you create a Message Template, see How To: Setup an Email Template to send Customers their Unique Alias Offer Code then then create an associated Trigger Rule.
- Open an Email Manager screen.
- Press the Trigger Rules radio button and click "GO" to display existing trigger rules.
Note: existing trigger rules can be opened by double clicking on them in the list. - Press Ctrl+N or click
 to create a new trigger rule.
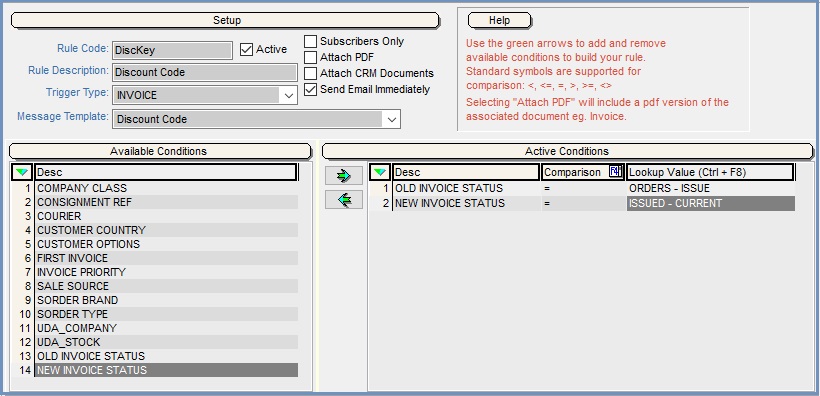
 - Assign a code to the trigger rule and enter this in the "Rule Code" field.
- Add a trigger rule description in the "Rule Description" field.
- Select the Trigger Type of INVOICE.
- Select the Message Template you created to send out the discount code.
- Tick the "Send Email Immediately" checkbox if the email is to be automatically sent and not held in the Pending emails section.
- Tick the "Active" checkbox when you wish the Trigger Rule to be enabled.
Note: this may be after you have finished creating and testing the Trigger Rule. - Tick the "Subscribers Only" checkbox to only send the email to customers with E-Mailing List Subscriber ticked in their
[ Customer |Detail | Address ]tab. (Optional) - Move the following conditions from the Available Conditions grid to the Active Conditions grid using the
 button.
- OLD INVOICE STATUS
- NEW INVOICE STATUS
- In the Comparison field press F4 and select = for each condition.
- For each condition:
- Click in the "Lookup Value" column for the first line and press Ctrl+F8 to display the "Make a Selection" dialog.
- Select ORDERS - ISSUE.
- Click "OK"; the criteria will then be shown in the right-hand "Active Conditions" grid.
- Click in the "Lookup Value" column for the second line and press Ctrl+F8 to display the "Make a Selection" dialog.
- Select ISSUED - CURRENT.
- Click "OK"; the criteria will then be shown in the right-hand "Active Conditions" grid.
- Repeat as required to add another condition for example limit the trigger to a Company Class.
Note: All the active conditions have to be true at the same time in order for the rule to work. - Press Ctrl+S or click
 to save the Trigger Rule.
.

