
Customer Address Tab
For the Other Action Menu options (press F9 or ![]() ) see Customer Other Actions Menu.
) see Customer Other Actions Menu.
Contents
The customer address details area consists of the input area on the left and the grid on the right.
Address Fields and Buttons
- Address, Address, Locality: three address lines for non-specific address data.Note: there are two Context Menu options available for the two 'Address' fields:
- Insert Address Value: when in edit mode the user can insert new address details in either of the address fields
- Remove Address Value: when in edit mode the user can remove the address details they are focused on. This will pull the fields below it up. For example, if you remove the second address line then the text populating the 'Locality' field will moved up into the 'Address' field and replace it.
- Town, County, Country, Post Code: additional address fields with specific meanings.
 : opens Google Maps displaying the location of the customer's address.
- Type: how the address is used (e.g. for invoices, deliveries, statements, etc.). These are setup and created within System Data - Address Types.
- Email: primary contact or customer's email address. Pressing
 opens the Email Creator dialog, see How To: Email from the Customer/Supplier Screens.Notes:
- The system will check that the email address is valid when creating a new customer and when editing an existing company or contact record. A warning will be displayed if the email address is not valid and can be acknowledged and saved or amended as required.
- Emails can also be sent from the Contact Details grid using the Context Menu.
- The system will check that the email address has an @ symbol in before sending the email.
- Phone, Fax: customer or primary contact's telephone and fax numbers.
Note: You may find it advisable to copy any reference to TPS registration from the contact's 'Phone' field to the addresses' 'Phone' field, replacing the telephone number.  : used for customers with multiple addresses to limit the number of records returned in the main list screen. The purpose of this is to hide the address from appearing when a new sales order is placed. See How To: Hide and Reveal Addresses for more details. This button was formerly used when a customer removed an address to prevent new sales orders being assigned to the old address whilst allowing historical records to be retained for audit purposes, etc (
 /
/ traffic light filter).
Note: the "Hide Address" functionality has largely been superseded by the-
 : this displays the All Addresses Details dialog allowing the user to deactivate (and reactivate) company addresses and contacts, see How To: Mark Address Active or Inactive. Once deactivated the address and contacts are not visible in the system except in the All Addresses Details dialog.
Note: contacts and addresses must not be deleted or overwritten, but marked as deactivated. This ensures that the sales and purchase history remains with the correct contact and address for reporting purposes.  Customer only: used to specify preferred delivery address. If set (i.e. traffic light indicator is green), this address is used as the default delivery address for all new sales orders raised against this Customer UNLESS 'Invoice address as default' is
  TICKED within
 [ System Values | Sales | Order Display ](when the first active invoice address found against the customer will be used). ( / traffic light filter). : permanently anonymises a customer's address data.
 : keeps the address data intact in the company record but anonymises it elsewhere in Khaos Control.
Note: for more information about anonymising and holding contacts, addresses and companies please see GDPR - Anonymisation and Data Holding.- Customs Invoice: when ticked, shipments to this address will use the Customs Invoice template by default, instead of the standard invoice template.
- WARNING: If the user enters edit mode, anonymises, then cancels edit mode, anonymisation is still done. It does not require edit mode
 toggles display of secondary address types:
- Organisation: if set, reports will use the Organisation instead of Company Name for example on Invoice / Despatch Notes and Picking Tickets as well as for Print Envelope, Notepad and Clipboard accessed using the
 ,
,  and
and  buttons below. It can also be added to Invoice Message Templates, see Invoice Trigger Type Tags.
Note: this is used for Basic Reports. - Longitude: the company's longitude which can be exported in the Company XML file.
- Latitude: the company's latitude which can be exported in the Company XML file.
- Organisation: if set, reports will use the Organisation instead of Company Name for example on Invoice / Despatch Notes and Picking Tickets as well as for Print Envelope, Notepad and Clipboard accessed using the
Notes:
- When creating a sales order the system will select the latest invoice address unless the 'Invoice Address as default' checkbox has been ticked in
[ System Values | Sales | Order Display ]in which case it will use the first invoice address as both the invoice address and the delivery address for all orders. - If this is not ticked the system will then check to see if the Select contact/address on lookup checkbox is ticked in
[ System Values | Companies | General ]. If this is ticked the system will override a preferred delivery address setting if the company lookup is used. The system will set the delivery address to that selected in the company lookup. - Users should be careful that if they wish to add a new address they DO NOT overwrite an existing address and use the procedure as described in How To: Add a New Address.
Contact Details for Selected Address
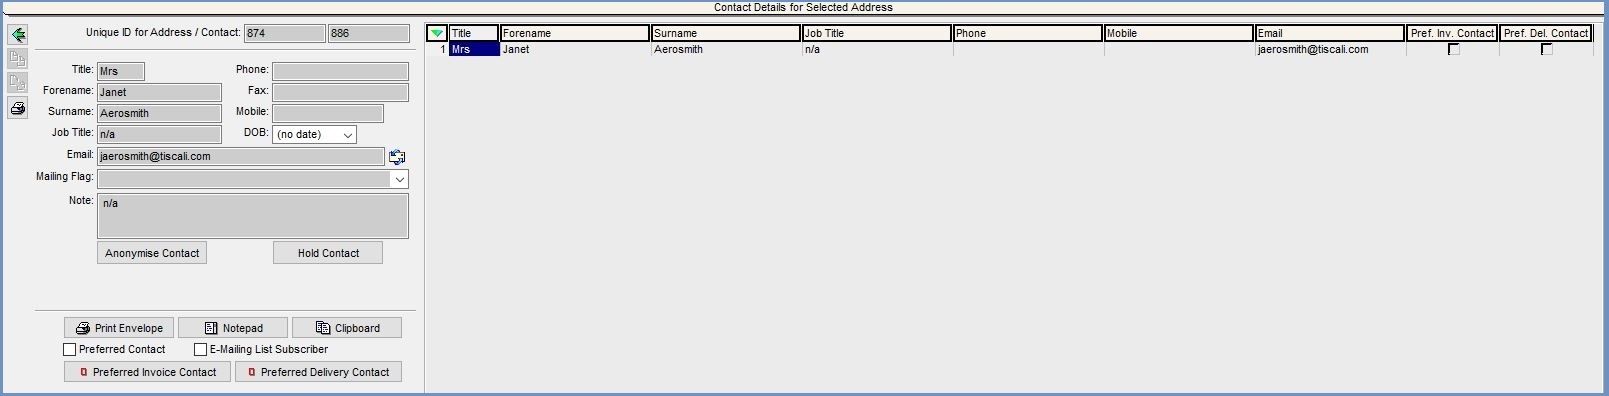
The contact details details area consists of the input area on the left and the grid on the right.
- Unique ID for Address / Contact: in Khaos Control each contact and address has its own unique ID displayed in these fields.
- Title, Forename (max 50 characters) , Surname (max 50 characters) : the contact's name.
- Job Title: the contact's position. Leave this blank for mail-order customers.
- Phone, Fax, Mobile: telephone, fax and mobile numbers for the contact. One way of recording individuals that have registered with the Telephone Preference Service is to insert "TPS Regd" into the contact's 'Phone' field, together with the date you first became aware of this. For example: "TPS Regd 28-Sep-2011".
Note: You may find it advisable to copy any reference to TPS registration from the contact's 'Phone' field to the addresses' 'Phone', replacing the telephone number. - DOB: the contact's date of birth.
- Email (max 250 characters) : the email address for the contact. Pressing opens the Email Creator dialog, see How To: Email from the Customer/Supplier Screens.Notes:
- The system will check that the email address is valid when creating a new customer and when editing an existing company or contact record. A warning will be displayed if the email address is not valid and can be acknowledged and saved or amended as required.
- The address will appear on printouts that are configured to include email addresses.
- Email addresses with more than 250 characters will save, however, characters over the 250 limit will not be saved. For example, if an email is input with 257 characters, 7 characters will be removed from the end of the email address.
- Emails can also be sent from the Contact Details grid using the Context Menu.
- The system will check that the email address has an @ symbol in before sending the email.
- Mailing Flag: displays the requested mailing status of the contact recorded for data protection purposes. This field should be used to indicate whether the contact wishes to receive information from different marketing sources.
Note: sales orders imported via a webservice have a Mailing Status set at the contact level for GDPR compliance. - Note: to record any notes related specifically to the contact.
 : permanently anonymises the company's contact data.
 : keeps contact data intact within the company record but anonymises it elsewhere within Khaos Control.
Note: for more information about anonymising and holding contacts, addresses and companies please see GDPR - Anonymisation and Data Holding.
- WARNING: If the user enters edit mode, anonymises, then cancels edit mode, anonymisation is still done. It does not require edit mode
- : opens the 'Print' dialog. Formatted to print name and address on standard DL type envelope.
Note: DL format must be selected in printer properties. - : opens 'Notepad' and enters the selected contact name and associated address.
- : copies the selected contact name and associated address to the system clipboard.
Note: if an 'Organisation' has been entered then this is used instead of Customer Name when the Print Envelope, Notepad and Clipboard options are used. - Preferred Contact: allows a Preferred Contact to be specified, where multiple contacts have been created against this Customer.
- E-Mailing List Subscriber: when ticked the contact can be sent emails, normally for marketing purposes when the E-mailing list option has been activated for example against Trigger Rules.
 : used to note who the Preferred Invoice Contact is, will be used when creating new Sales Orders ( / traffic light filter).
 : used to note who the Preferred Delivery Contact is, will be used when creating new Sales Orders ( / traffic light filter).
Contact Details for Selected Address Context Menu
- Send Email: opens the Email Creator Dialog for the contact you are currently focused on in the grid allowing you to send an email to that contact. This dialog will not appear if the contact does not have an email address.
- Clear Selection: deselects the currently selected line(s).
Action Buttons

 left and right green arrow keys allow the user to toggle between seeing all the details of an Address/Contact, or seeing all the addresses/contact details recorded for the customer in a grid.
 used to create a new Address or Contact.
  used to delete an Address or Contact.
 used (if software is installed) to speed up entering new addresses by way of the Post Code Lookup dialog.
- displays the All Address Details popup held against the URN, allowing addresses to be activated or deactivated (i.e. set as discontinued).
Note: Inactive addresses will still appear on historic sales orders, but will not be available for selection on new sales orders.  : creates a report containing the contact name and address.