
Quick Stock Entry in Sales Orders
What is Quick Stock Entry
Quick Stock Entry dialog in a sales order allows users to quickly add stock items to sales orders with the quantity required.
Notes:
- The amount entered in the Quick Stock Entry will override the default amount to add to a sales order set up in
[ System Data | Stock | Level 2: Type ]. - Quick Stock Entry uses stock codes and not catalogue codes.
- Up and Cross Sell items will need to be added manually once the parent item has been added by focusing on the parent item and double clicking on the yellow band of the Up/Cross box in the top right of the sales order to load the Up/Cross Sell dialog.
- Quick stock entry is also available in Purchase Orders, Delivery Notes, Stock Adjustments and Consignments.
- Quick stock entry does not work when adding the barcode in the barcode button, the Other Ref or Catalogue code.
Notes:- Except in the Stock Adjustments screen where both the barcode button and the Other Ref work.
- The system will accept the first value it finds, so multiple barcodes in the system will result in potentially unexpected/undesirable results.
- Stock codes, for example on an email, can be copied Ctrl+C and pasted Ctrl+V into the Quick Stock Entry dialog. Make sure that you update the quantity of the items before pasting in the stock codes. A default quantity will be asked for but can be updated in the sales order either manually or by copying and pasting the quantities into the relevant column.
What are the Benefits of Quick Stock Entry
Benefits of using Quick Stock Entry include:
- Stock Items can be added to a sales order by just using the keyboard keys.
- Telesales users who know the stock codes will find using Quick Stock Entry a quick method of entering stock items into a sales order.
- Businesses whose customers send them long lists of stock codes, for example by fax or email, to add to a sales order will find using Quick Stock Entry will speed up the process.
How to Access the Quick Stock Entry Dialog
The Quick Stock Entry dialog is loaded by pressing Ctrl+Q while focused in the relevant grid in the following screens:
- Sales Orders
- Purchase Orders
- Delivery Notes
- Stock Adjustments
- Consignments Detail
- Promotion Price Lists:
The Quick Stock Entry dialog is also available from the context menu in the above grids.
The Quick Stock Entry Dialog
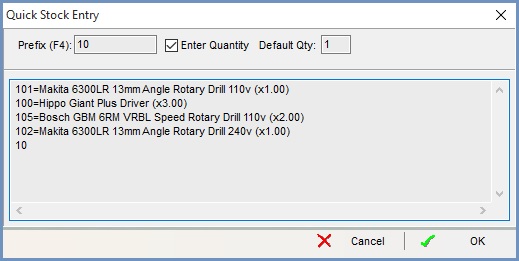
- Prefix (F4): allows the user to enter a stock code prefix; for example, if all the stock codes started with '10' the user would enter this into the Prefix field and just enter the end part of the stock code into the main area.
- Enter Quantity checkbox (default=ticked): allows the user to enter a quantity other than the default 1.
- Default Qty: allows the user to enter a default quantity other than 1.
- Display area: displays the stock code, description, quantity, unit price and net/gross indicator of the chosen stock item.
Quick Stock Entry Examples
Note: if an erroneous stock code is entered the system lets the user carry on and reports an error 'unknown'.
Adding Different Quantities of Stock Items to an Order (default)
- Create a new sales order, see How To: Create a New Sales Order.
- Press Ctrl+Q to open the Quick Stock Entry dialog.
- Enter the first code.
- Press Enter.
- In the popup enter the quantity required or leave it at the default quantity of 1.
Note: you can change the default quantity of 1 to the number that you are most likely to require. - Click on 'OK' or Enter. The stock description associated with the code will appear along with the quantity and net unit price.
- Repeat steps 3 to 6 until all the stock items have been added.
- Click on 'OK' or press Ctrl+ Enter to add the items and quantities to the sales order grid.
Adding One of Each Stock Item to an Order
- Create a new sales order, see How To: Create a New Sales Order.
- Press Ctrl+Q to open the Quick Stock Entry dialog.
- Press F4 to move focus to the Prefiic (F4) field.
- Tab to move to the Enter Quantity checkbox.
- Spacebar to untick the checkbox.
- Tab to move to the input panel below.
- Enter the first code into the main area.
- Press Enter. The stock description associated with the code will appear along with the quantity and net unit price.
- Repeat the previous two steps until all the stock items have been added to the display area.
- Click on 'OK' or press Ctrl+ Enter to add the items and quantities to the sales order grid.
Using the Prefix in Quick Stock Entry
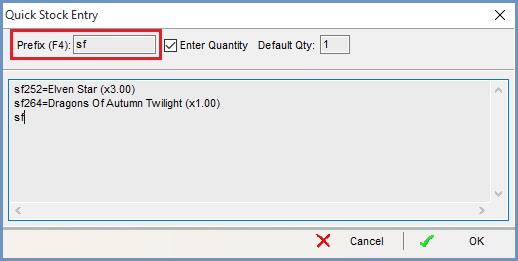
- Create a new sales order, see How To: Create a New Sales Order.
- Press Ctrl+Q to open the Quick Stock Entry dialog.
- Press F4 so the cursor is in the Prefix (F4) field.
- Enter the prefix, in the above image the prefix is 'SF'.
- Press Enter, the system will add the prefix into the display area.
- Enter the add the remainder of the first item code (i.e. without the prefix).
- Press Enter.
- In the popup enter the quantity required or leave it at the default quantity of 1.
- Click on OK or Enter. The stock description associated with the code will appear along with the quantity and net unit price.
- Repeat steps 6 to 9 until all the stock items have been added to the display area.
- Either click on 'OK' or press Ctrl+ Enter.