How To: Filter Customer User Defined Attributes (UDAs)
Once setup, see How To: Setup Stock UDAs and How To: Setup Stock UDAs with Groups, users can filter and view UDAs for them in the following screens:
-
[ Customer | List ]screen. -
[ Sales Summary | Best Sellers ]screen. -
[ Sales Summary | Customers ]screen.

- In the
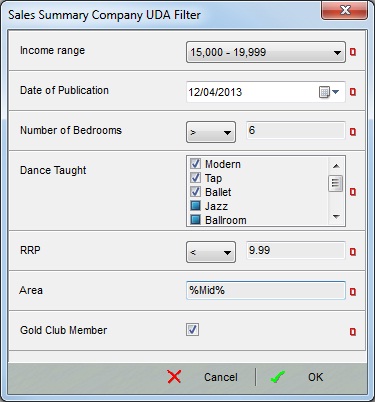
[ Customer | List ]screen click on the UDA Filter button. - Select or enter the relevant UDA filter values, the options will depend on the type of UDA:
- Choice: select the required option from the drop down list.
- Date: click on the right side of the date field and select the specific date.
- Integer: enter the whole number only and select the comparison on the left:
- =: equal to.
- !=: not this option.
- <: less than.
- <=: less than or equal to.
- >: greater than.
- >=: greater than or equal to.
- List: select one or more options using the tri-state checkboxes:
 Tri-State ignore: ignore this option.
 Tri-State on (yes): filter for this option.
 Tri-State off (no): don't filter for this option.
- Number: enter a number with decimals, as per Integer UDAs, Number UDAs use comparisons when filtering.
- Text: enter the text in the seach, this can be suffixed or prefixed by a % wildcard.
- Yes/No: tick the checkbox for Yes or unticked for No.
- Turn filter on by clicking on the adjacent traffic light to turn it to green.
- Click 'OK', the results will filter for the selections made.
