How To: Add the Dimensions to Basic Report Documents
| | Adding Dimensions to Basic Report Documents is an Advanced User feature. |
- WARNING: Before making changes to ANY of your Basic Report templates it is advisable to take a backup.
The dimensions (H x W X D) and Volume for single stock items can be added to the following Basic Report documents:
- Invoice
- Customs Invoice
- Delivery Note
- Picking/Despatch Note
Notes:
- The dimension figures come from the
[ Stock | Detail | Properties ]screen for each item. - The dimensions will default to 0 so should result in 0 in the report where applicable.
Configuring your Basic Reports
- Follow the menu route
[ System Operations | Basic Reports Setup ]to open the 'Basic Reports Setup' dialog. - Double-click on the basic report you wish to edit.
- If this is for a brand, select the brand if one has been setup.
- Press the
 button to open the Design tab and edit the selected report template.
Totalling the dimensions for all stock on the report
You can add fields that show the total height, width, depth and volume of the all items on a report in DBBase
- height: item height x item quantity sent
- width: item width x item quantity sent
- depth: item depth x item quantity sent
- volume: item height x width x depth x item quantity sent
- Make sure you are in the Main: DBBase tab.
- Click on the
 (DBText) button on the Data Components toolbar at the top.
 - Click in the relevant area to add the DBText field, for example the Detail area.
- Make sure the DataPipeline is set to DBBase in the area at the top of the screen and from the drop-down to the left select volume (or height, width, depth).
 .
.
Note: you can also set this using the Object Inspector bar on the left. If the Object Inspector pane is not visible right click anywhere under the Report Tree (usually on the left side) and select it from the Context Menu. - With your option selected, update the caption, size and fonts in the Layout and Text areas on the left as desired.
- Click on the
 (label) button on the Data Components toolbar at the top.
 - Click next to your DBText field to add the label.
- With the label selected, update the caption, size and fonts in the Layout and Text areas on the left as desired.
- Repeat as required to add the other volumetric fields.
- Once complete save the report template changes by using the menu option
[ File | Save ]. - Test to ensure that the information and layout are as expected. You may need to tweak the positions of the different fields.
Adding the individual dimensions for the stock items
There are four options that can be set to display the volumetric information per stock item available in srDetails: DBDetails :
- height: item height x item qty sent
- width: item width x item qty sent
- depth: item depth x item qty sent
- volume: item height x width x depth x item qty sent
To add these to your document:
- Click on the section tab srDetails: DBDetails
 located beneath the layout area in the centre bottom of the screen.
 - Click on the (DBText) button on the Data Components toolbar at the top.
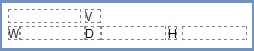
- Click in the relevant area to add the DBText field, for example the Detail area.
- Make sure the DataPipeline is set to DBDetails in the area at the top of the screen and from the drop-down to the left select volume (or height, width, depth).
 .
.
Note: you can also set this using the Object Inspector bar on the left. If the Object Inspector pane is not visible right click anywhere under the Report Tree (usually on the left side) and select it from the Context Menu. - With your option selected, update the caption, size and fonts in the Layout and Text areas on the left as desired.
- Click on the (label) button on the Data Components toolbar at the top.
- Click next to your DBText field to add the label.
- With the label selected, update the caption, size and fonts in the Layout and Text areas on the left as desired.
- Repeat as required to add the other volumetric fields.
- Once complete save the report template changes by using the menu option
[ File | Save ]. - Test to ensure that the information and layout are as expected. You may need to tweak the positions of the different fields.