
Warehouse Tasks
Note : the use of Warehouse Tasks with HHTs is not currently supported
Overview
Warehouse Tasks allows users to have more control over the processing of various jobs in the system including:
- Controlling the pick/pack and despatch process through the
[ Sales Invoice Manager ]. - Controlling the process when building stock items allowing users to indicate the moment that a build is completed, and the built item is available for sale.
- The functionality can also be used in systems with Warehouse Control enabled for replenishment jobs.
- The system stores start and end times for jobs to allow management to retrieve process timings from the system for better KPI tracking and reporting.
Configuration
Mandatory Configuration
- When using the Build functionality in a warehouse controlled system a warehouse must exist called 'InBuild', which in turn must contain a multi-stock location called 'Inbuild' which the system will use as a temporary holding location for build components while build jobs are in progress, see Setting up the Stock Picking Locations.
- Picking Profiles will need to be set up, see How To: Setup a Picking Profile Configuration..
- The Pick Ticket basic report will need the Job and Batch Code barcodes to be added so the users have something to scan when they have completed their job, see Picking Ticket Report.
- Pick Error reasons will need to be set up in
[ System Data | Sales Order Processing | Warehouse Error Code Types ]
Optional Configuration
The Warehouse Tasks system has several options that require configuring in System Values and that determine how the Warehouse Job functionality will operate, see System Values - Warehouse - Warehouse Jobs.
Picking Profile Configuration
Warehouse Tasks allow the user to setup options that will be applied when sales orders are batched together, for more information please see How To: Setup a Picking Profile Configuration.
Final Steps
A final step of configuration would be to open the WARE screen from the command window and press the Scanning button. Within the dialog that pops up click Print Barcode List to access a sheet of barcodes with the user barcodes towards the bottom. These should be printed and provided in some manner to the users of the system. A suggestion for how/where this might be provided might be on the User's ID card, name badge or something else which the user must always have on their person.
The Warehouse Tasks Screen
To open the Warehouse Tasks Screen:
- Type 'ware' into the Command Window.
- Press enter.
or
- Open
[ Sales Invoice Manager ]. - Select Warehouse Jobs from the Other Actions Menu.
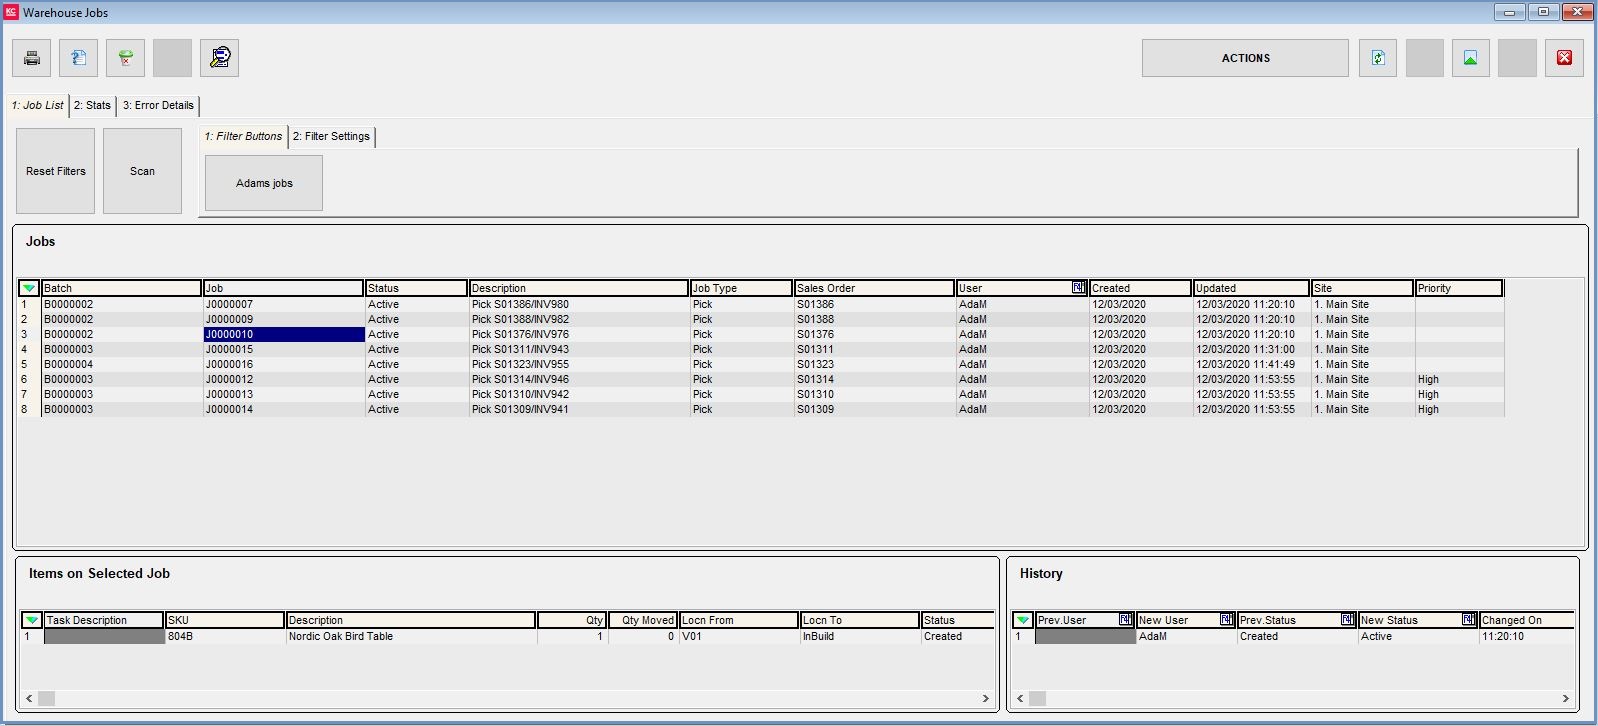
Job List Tab
Action Buttons
 : will reprint selected jobs.
 : deletes an entire record (note this button is not functional in the warehouse jobs screen).
 : will save filter sets created in the Filter Settings tab and create a Filter Button.
- Reset Filters: cancels any filters applied by the filter buttons or filters in the Filter Settings tab.
- Scan: opens the Scan Dialog
- Actions: opens the Actions Dialog containing the following options:
- Set Priority of Selected Jobs: allows the user to prioritise green-selected jobs in the grid.
- Scanning: opens the Scanning Dialog.
- Print Mode Barcodes: prints a list of barcodes allowing the user to change the scanning mode using a barcode scanner.
- Print User Barcodes: produces a barcode for each system user, allowing them to scan themselves in and pick up jobs.
Filter Buttons
Filter sets saved and named in the Filter Settings tab will appear here as buttons that will apply the saved filters.
Jobs Grid
- Batch: (pick jobs only): the batch number of the selected pick jobs allocated to the user.
- Job: the job number of the individual pick, build or replenishment job.
- Status: the status of the current job. The options are:
- Created
- Allocated
- Active
- Complete
- Cancelled
- Error
- Description: a description of the job. Pick jobs will include the sales and invoice numbers of the order being picked.
- Job Type: the type of job. The options are:
- Pick
- Build
- Auto Build
- Move
- Sales Order: the sales order relating to a pick job.
- User: the user to whom the job is allocated.
- Created: the date the job was created.
- Updated: the date and time the status of the job was last updated.
- Site: the site in which the job was created.
- Priority: the priority (if any) of the job applied via the Actions button.
Items on Selected Job grid
Focusing on a job in the Jobs Grid will populate this grid with a list of items for the selected job.
- Task Description: a description of the task required to complete the job.
- SKU: the stock code of the item.
- Description: the description of the item.
- Qty: the quantity of the item required for the job.
- Qty Moved the quantity of the item that has been moved when the job is marked as complete.
- Locn From: The source location of the item.
- Locn To: the destination location of the item.
- Status: the current status of the job to which the item belongs.
- Processed On: the date on which a completed job was processed.
History Grid
The History Grid provides an audit trail on the progress of a selected job.
- Prev. User: the previous user at the point the status of the job was changed.
- New User: the new user (if any) after the status of the order was changed.
- Prev. Status: the status of the job before the status was updated.
- New Status: the status of the job after the status was updated.
- Changed On: the time the status was changed.
Filter Settings Sub Tab

- User: filters for jobs allocated to a specified user.
- Job Type: filters by job type.
- Job Status: filters by job status.
- Date Created: filters by the date the job was created.
- Job Code: filters by job code.
- Site: filters by site.
Stats Tab

The Stats tab will show overall daily statistics, as well as user specific statistics that can be viewed over a specified date range, by job type.
The Per-User Statistics are viewed in the main grid:
- User Name: the user's user name.
- Jobs Completed: the number of jobs completed over the date range selected.
- Jobs Assigned: the number of jobs assigned over the date range selected.
- Percentage Completed: the percentage of assigned jobs marked as completed over the selected date range.
- Average Completion Time: the average completion time in minutes per job over the selected date range.
- Job Type: the type of job the line refers to.
Error Details Tab

The error details tab shows an archive of all jobs that have been marked as an error, and can be filtered by date and/or user.
- Job Code: the job code for which the error has been reported.
- Select Error Reason: the error reason selected when the error was reported - these must be set up in advance in System Data.
- Short error description: the free text description entered when the job was scanned as in error.
- User: the user who scanned the job as an error.
- Date: the date the job was scanned as an error.
Usage (Pick/Pack/Despatch Process)
This feature and functionality are not active within the system by default. The user will have to have activated this within the System Values screen before they will be able to make use of Pick/Pack/Despatch Jobs within their instance of Khaos Control. When Sales Orders hit Khaos Control their associated invoices can appear at various stages of Sales Invoice Manager (SIM). The Warehouse Jobs process picks up once these orders have been deemed ready for picking and have been pushed into the Picking stage of SIM.
The process is as follows:
- Green select as many orders as are ready to process within the Picking stage. Often this should be all of them.
- Use the button "Process Jobs" at the bottom of the screen to apply the rules from the Picking Profile Configuration screen to the orders you have green selected.
- Type 'WARE' into the Command Window to open the Warehouse Jobs screen. Refresh this screen to see the orders just processed.
- The Warehouse Jobs screen does not appear in the command window, so you can only navigate back to it using CTRL+TAB.
- When on the Warehouse Jobs screen, you can click the Scanning button at the top left of the screen, or select 'Scanning' from the Actions button, to open up the processing screen, which is where the system should rest while in use by the warehouse staff.
- In the Warehouse Job Actions button there are options called Print User Barcodes and Print Mode Barcodes, which will allow users to print out the barcodes relating to user IDs or the different processes the system is capable of.
- When a user wants a job to perform, they approach the system and scan in their user ID.
- The system will allocate the next available job to the user and print any paperwork associated with that job.
- The user then completes the job they have been provided, at which point they return to the system and scan the Batch Code for a pick batch or the Job Code for a single pick, build or replenishment task.
- The system will record the start and end times of these activities in order to provide metrics to management on the performance of the users of the system.
Problems with picking an order:
- Should the user be unable to complete their pick process they can indicate to the system that there was a problem with the pick by first scanning the problem code (MPR) then scanning the Job Code of the problem and the system will move the status of that order int 'error'. The user then can follow a physical process to indicate the issue to a supervisor.
- Remember to set the mode back to Allocate (MAL) after the problem has been scanned in.
- After a problem has been identified with the order and the MPR process has been run against that Job Code there will eventually come a point where the order will need to be processed to completion. To do this you will need to scan MPU (pick up) then the user barcode for the user to pick up the work, then the Job Code.
Usage (Build Jobs)
This feature and functionality is not active within the system by default. The user will have to have activated this within the System Values screen before they will be able to make use of Build Jobs within their instance of Khaos Control.
At whatever point the user decides that stock needs to be built (whether in response to orders entering the system or just for stock to sit on a shelf) they go to the Stock Code to be build and press the Build button as per the current process. The following dialog will be displayed: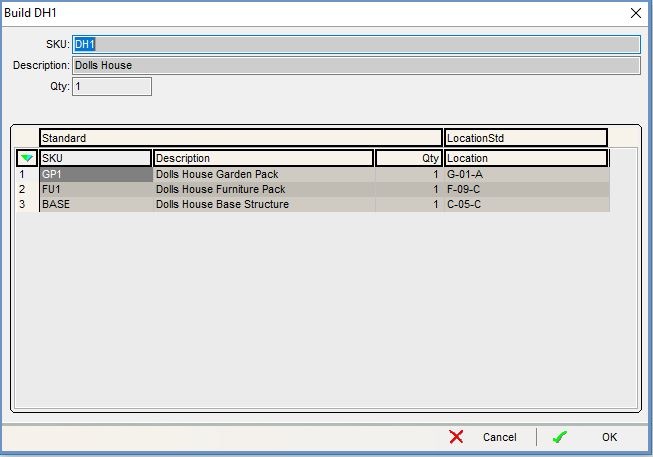
- Set the Qty to the amount of parent items needed in this build process.
- Set the location to the location the parent item is to be built to (Warehouse Controlled systems only)
- Set the locations for the child items to come from (Warehouse Controlled systems only) - the user will need to know which locations have enough stock before opening this screen.
- Click OK
This will create a job which will be listed in the Warehouse Jobs Screen. This can then be allocated to an individual user so they get it as their next job when they request one from the system. This means that the system administrator/manager can ensure the right people do the builds. The process for builds is the same as for pick/pack/despatch. The user scans their ID, is given the build job and the build paperwork prints off for them. They then build the products and scan the build job barcode to complete the build process. The child items of the build will move to InBuild (as per configuration above) while the process is being performed. Once the barcode to complete the job is scanned the system will process the stock movements and adjust in the build parent to the appropriate amount for the build children which have been used.
Usage - Replenishment (Warehouse Enabled Systems Only)
This feature and functionality is not active within the system by default. The user will have to have activated this within the System Values screen before they will be able to make use of Replenishment Jobs within their instance of Khaos Control. The Replenishment screen within the SW Warehouse has new functionality associated with it. When the button 'Create and Process Batch Movement' is pressed this will create a job to move the quantities of product indicated by the user from the locations and to the locations of the configuration. This will instantly appear in the Warehouse Jobs screen. The user will then be able to go to the job and assign it to someone able to do stock replenishment if the warehouse only has specific users with the necessary skills for this. It is in this way that the warehouse manager/admin can control who does the replenishment if they do not want the system to allocate out the job to just anyone within the warehouse. The process is then the same as for pick/pack/despatch, the user scans their ID, is given the paperwork for the replenishment which they then follow to complete the replenishment task. The user then scans the barcode on the paperwork to complete the task and move the stock from their locations to the new locations.