How To: Setup Order Confirmation Emails
| | Creating and Editing Email Templates is an Advanced User feature. |
There are two steps to creating emails that are automatically created and sent to the customer to confirm their order:
- Setup the Message Template
- Setup the Trigger Rule
Two Trigger Rules are required along with two Message Templates to cater for the following scenarios:
- For orders which go to Staging first, for example either those that are 100% fulfilled although this may differ if you have setup Invoice Rules so you are going to part-ship orders.
- For orders that are awaiting stock.
Setup the Message Templates
Set up a Message Template with a Trigger Type of INVOICE for each scenario above, see How To: Setup Email Templates.
Setup the Trigger Rules
Email Trigger Rules prompt the system into creating and in some instances automatically sending emails from Khaos Control, you will need to create TWO new Trigger Rules for the different sceanrios.
- Open an Email Manager screen.
- Click in the Trigger Rules radio button to display existing trigger rules.
- Press Ctrl+N or click
 .
. - Add the trigger rule code in the Rule Code field.
- Add a trigger rule description in the Rule Description field.
- Select INVOICE from the Trigger Type drop down.
- Select the appropriate message template (either for orders going into Staging or those going into Awaiting Stock) from the Message Template drop-down.
- Tick the 'Send Email Immediately' checkbox if the email is to be automatically sent and not held in the Pending emails section.
- Tick the 'Active' checkbox when you wish the Trigger Rule to be enabled.
- Setup the appropriate conditions:
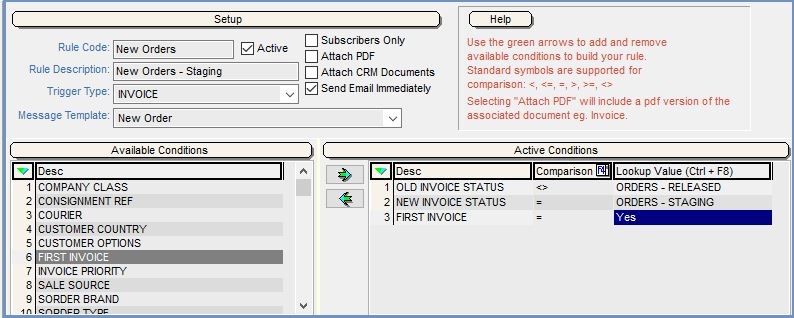
- Method One - for Orders going into Staging:
- Focus on Old Invoice Status in the Available Conditions area on the lower left.
- Click on the
 to add the condition to the Active Conditions grid.
 - Focus in the Comparison column and enter <>.
- Focus in the lookup Value column then press Ctrl+F8 and select Orders - Released stage.
- Click on OK.
- Focus on New Invoice Status in the Available Conditions area on the lower left.
- Click on the
 to add the condition to the Active Conditions grid.
 - Focus in the Comparison column and enter =.
- Focus in the lookup Value column then press Ctrl+F8 and select Orders - Staging stage.
- Click on OK.
- Focus on First Invoice in the Available Conditions area on the lower left.
- Click on the
 to add the condition to the Active Conditions grid.
 - Focus in the Comparison column and enter =.
- Focus in the lookup Value column then press Ctrl+F8 and enter Yes.
- Click on OK.
- Add further conditions as required.

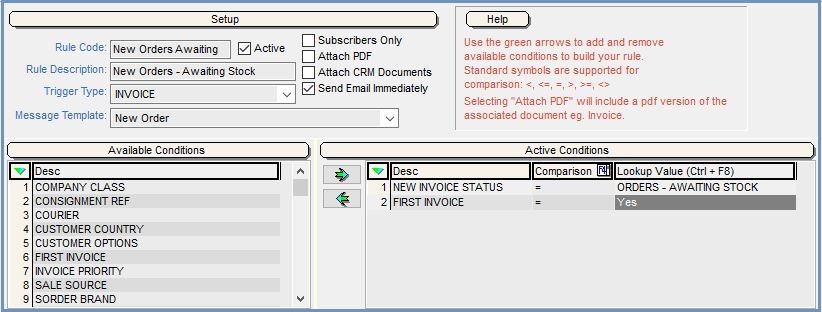
- Method Two - for Orders going into Awaiting Stock:
- Focus on New Invoice Status in the Available Conditions area on the lower left.
- Click on the
 to add the condition to the Active Conditions grid.
 - Focus in the Comparison column and enter =.
- Focus in the lookup Value column then press Ctrl+F8 and select Orders - Awaiting Stock stage.
- Click on OK.
- Focus on First Invoice in the Available Conditions area on the lower left.
- Click on the
 to add the condition to the Active Conditions grid.
 - Focus in the Comparison column and enter =.
- Focus in the lookup Value column then press Ctrl+F8 and enter Yes.
- Click on OK.
- Add further conditions as required.

- Method One - for Orders going into Staging:
- Press Ctrl+S or click
 to save the Trigger Rule. For an example of a trigger rule see example of a Trigger Rule.
 - Test to see if the Trigger Rule and Template work as required.
Notes
The Trigger Rules generate an email when a customer has the following set-up against them:
- When the customer's invoice contact has an e-mail address.
- When there is no email address for the invoice contact the invoice address' email address will be used.
- If there is no email address then the system will not generate an email for the customer.
