
How To: Reconcile Nominal Transactions
This functionality allows transactions where the total Debit and the total Credit are equal to be matched together. Once these transactions are matched they will be removed from view, leaving only unmatched transactions visible in the screen.
This allows a financial user to go through each nominal, hiding those that match, and leaving only those transactions which contribute to an overall change to the balance of that nominal account.
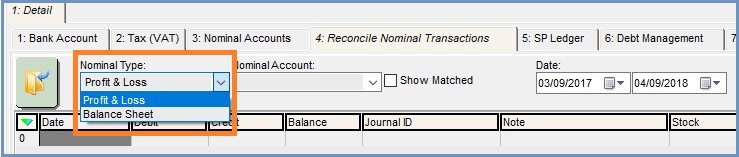
Each Nominal account is accessible from a drop-down menu in the [ Accounts | Detail | Reconcile Nominal Transaction ] screen, alongside a drop-down menu that allows the user to select whether they are selecting between Balance Sheet or Profit & Loss nominal accounts, this by default will be set to Balance Sheet.
Note: The transaction shown in this screen will also include closed financial periods.
Configuration
Before you can start using Nominal Transaction Reconciliation you will need to set whether a nominal account will be shown in the [ Accounts | Detail | Reconcile Nominal Transaction ] screen. This can be done by going to the [ Accounts | Nominal Accounts | Nominal Accounts ] tab, find the nominal account you wish to add to the [ Accounts | Detail | Reconcile Nominal Transaction ] screen and tick the box in the 'Reconcile?' row:

Once the nominal account has been marked for reconciliation the nominal account will now be available to select from the [ Accounts | Detail | Reconcile Nominal Transaction ] screen from the drop-down menu. To remove an item from the [ Accounts | Detail | Reconcile Nominal Transactions ] simply untick the 'Reconcile?' tick box and upon reloading the screen this nominal account will now not be shown.
Usage
Navigate to the[ Accounts | Detail | Reconcile Nominal Transaction ] screen and use the drop-down menu for nominal type to select the nominal type to Profit & Loss or balance Sheet:
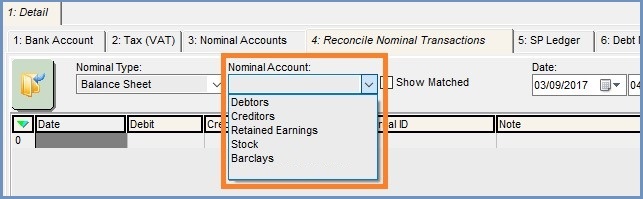
Next select the nominal account which was set up in the configuration steps. This can be done by selecting the second drop-down menu and navigating to the selected nominal account:
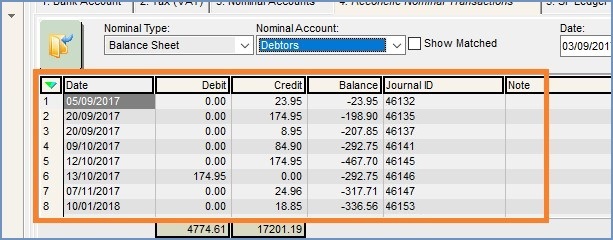
The date range can be set as with any other date filters in Khaos Control. Once these have been selected press the 'Go' button and any transactions within the time-period for the selected nominal account will be displayed in the top grid:
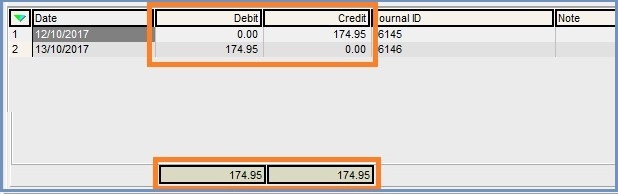
To match transactions, first locate the transaction that will be matched, then on each line tick the 'Match?' Tick box:

This will now be populated in the lower screen, where the match can be saved. When matching transactions, the Debit and the Credit values must be the same. This is reflected in the Debit / Credit column at the bottom of the screen, which will show the total for any items in the lower grid Area:
If these values match then the system will allow the match to be saved. If they do not match Khaos Control will display an error that the debit / credit values do not match.
To save the match click the Save Match button:

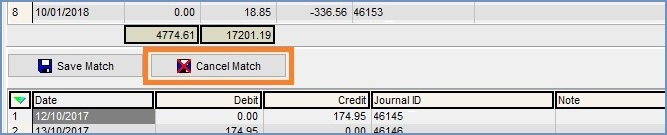
Or cancel the match by clicking the Cancel Match button. This will remove all entries from the bottom grid:
Once the transactions have been matched, they will be removed from both grids. These transactions can be viewed by ticking the 'Show Matched' tick box at the top of the screen. Once this is ticked the user will need to press the "Go" button again to view these hidden transactions. Once transactions have been matched they will be given a Match ID which will be visible in the 'Match ID' column.
Matches can have notes put against them in the lower grid, before the match is saved. To add a note to a single line focus (Left click) on the note field in the required line and add the note. The same note can be added to multiple lines using the 'Apply Value Range' option in the context menu.
Once an item has been matched the user can delete the existing match, to do this use the 'Show Matched' tick box to show matched transactions, then find the Matches that you wish to remove the match from and use the context menu in the top grid and select 'Delete Existing Match' .
Notes:
- Multiple items can be matched together at the same time, the only constraint on the matching process is that both the debit & credit totals must match up before a transaction can be saved.
- Only the Match Note field is editable in the lower grid are, no other field is editable within this screen.
- Changes made within this screen are relevant to this screen only; no changes will be made elsewhere in the system.