
Sales Returns - Detail tab
The [ Sales Returns | Detail ] tab is where returns are created and processed. It consists of four sub-tabs and two grids:
Notes:
- Before processing any returns the Return Reasons must be setup in
[ System Data | Sales Order Processing | Return Reasons ], see How To: Configure Return Reasons. - If a return is created for an item on a sales order that has a Keycode attached, the Keycode will be copied onto both the Credit Note and the Return Exchange.
- To preserve the original sell price and discounts for direct exchanges the sales order items must be moved from the upper grid to the lower grid using the direct exchange button
 .
. - Discounts in a Sales Order, which are displayed in the DiscH£(N) or DiscH£(G) columns, will be carried onto any Return that is generated. Any items going back out on the Exchange Note will proportion the discount value.
- When processing a return, the returned item will always be added to your stock file using the stock value for the item at the time the return is processed. So if the stock value of an item has increased or decreased since it was sold, it is the new value that will be used for the returned item, as you can't have two different stock values recorded against the same stock item.
Main Sub-tab
The Main sub-tab consists of four areas and two grids:
- Order Details area - [A]
- Options area - [B]
- Customer area - [C]
- Processing area - [D]
- Upper Items In grid - [E]
- Lower Items Out grid - [F]
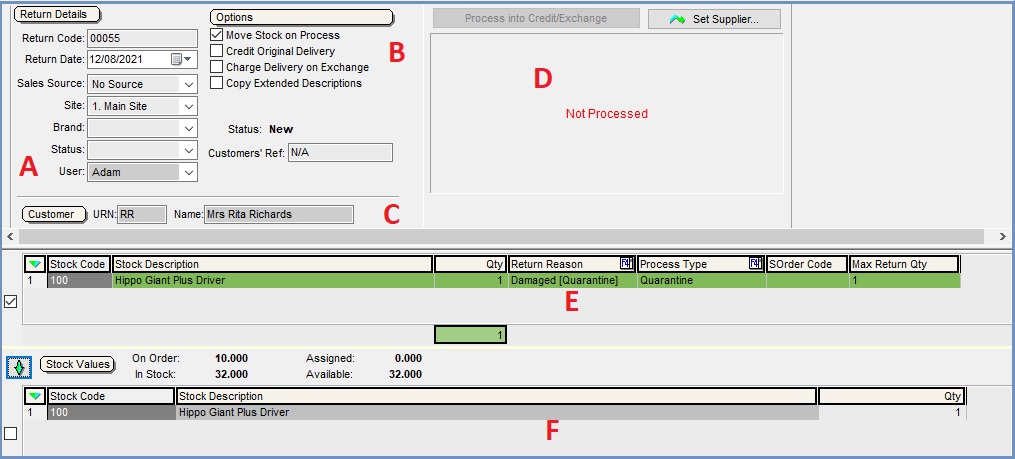
Order Details Area
- Return Code: generated by the system automatically; can be overwritten by the user. Prefix letters can be set in System Values.
- Return Date: date return created, although this can be changed by selecting a new date from the dropdown calendar.
- Sales Source: displays the sales source of the sales order is was created from. Sales sources are created and maintained in the System Data screen and are typically set to values such as telesales, internet, fax, e-mail, etc. The Sales Source can alternatively be used to monitor sales by team, for example: Northern sales team, London and Home Counties sales team, etc.
- Site: site returning stock should be booked back into, if applicable.
- Brand: initially this is pre-populated with the default brand of company class of the customer. If this is not found the user can select the brand from the list.
- Status: used to display the current status of the return (e.g. awaiting arrival, processed, etc). The return statuses are created and maintained in
[ System Data | Customer Return Status ]. - User: the name of the user who created the return.
Options Area
- Move Stock on Process check box:
- TICKED (default): the system will move/process stock back into the system automatically when the return is processed,
- UNTICKED: the system will move/process stock back into the system automatically when the return is issued.
- Notes:
- The stock will be moved into the location as set up when configuring the return reasons, see How To: Configure Return Reasons.
- For the effect this has on the stock value see Stock has been booked back in but the credit note has not been issued yet.
- This option can be made default by ticking the option Move stock on Issue checkbox in the Edit Process Path dialog.
- Credit Original Delivery check box: if ticked, the cost of the original delivery will be credited back to the customer.
- Charge Delivery on Exchange check box: if ticked the customer will be charged for delivery on their exchange order.
- Copy Extended Descriptions: if ticked the extended stock description from the original sales order will be copied onto the credit note (but not the exchange).
- Status: Displays the status of the return;
- New is only active during the returns creations,
- Awaiting Arrival means the system is awaiting the return items,
- Print means the return is being processed,
- Issued means return has been processed.
- Customers' Ref: Free text field where the user can put the customers return reference should they supply one.
Customer Area
- URN: customer's URN.
- Name: customer's name.
Processing Area
Note: this area, apart from the top Supplier button will be hidden until the return is processed.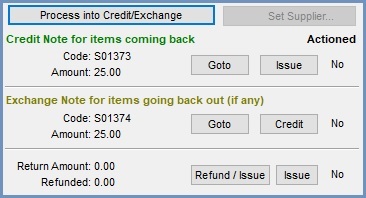
 : once the details of the return and any exchange items have been entered on the grid this button will process the exchange and create credit and exchange notes where applicable.
Note: only visible once the return has been saved. : when the processing type is set to 'Return to Supplier' then this button must be used to select the supplier the supplier return is to be created for, see How To: Create a Return to a Supplier from a Customer Return.
Notes:- This button is only visible when the return is being created.
- If the option to Open Supplier in User Permissions is un-ticked then the user will not be able to use this option.
- Credit note for items coming back:
- Code: code for credit note created; automatically assigned by the system.
- Amount: total value of credit note.
 : takes the user to the credit note (in the Sales Order Screen).
Note: the Type drop down box will show credit note. : issues the credit note in the Returns stage in the Sales Invoice Manager.
- Actioned: displays Yes if the credit note has been issued, else No.
- Exchange Note for items going back out (if any)
- Code: code for exchange note created; automatically assigned by the system.
- Amount: total value of exchange note.
- : takes the user to the new sales order created for the exchange item(s).
 : links the credit note to the exchange note to help pay for the items going out in exchange.
- Actioned: displays Yes if the credit note has been used as payment on the exchange note (e.g. paid, or part-paid, for the exchanged items), else No.
- Refund/Issue amounts and buttons
- Return amount: displays the difference between the credit note and the exchange note (where applicable). A positive number means the customer is required to pay additional money to process/complete the return. A negative figure means the customer is due a refund or credit for that amount.
- Refunded: displays the amount (if any) that has been refunded to the customer. If this figure equals a negative return amount above then the refund has been processed.
 : allows the user to refund the customer if a negative figure is shown in the return amount field using the original payment method on the sales order the return originated from and issues the return.
Note: there is an option that can be enabled that will warn the user if a different payment option or bank from the original sales order, is selected when processing the refund. This option is not enabled by default. Please email Development for more information.- : issues the return if no refund is required in the Sales Invoice Manager.
Items In Grid
The upper grid displays the items to be, or that have been, returned. The checkboxes to the left of the grids indicate which of the grids is active.
- Stock Code: stock code for the item.
- Stock Description: stock description for items to be returned/sent out.
- Qty: quantity of the stock item being returned.
- Return Reason: return reason (e.g. damaged or wrong size), see How To: Configure Return Reasons.
- Process Type: the process type can be changed from the default value associated with the return reason.
- SOrder Code: the sales order code of the sales order the return is linked to.
- Max Return Qty: The maximum remaining amount the customer could return.
Note: if using Batches, a column on the far right of the grid is called Batch (ent). If you need to split down several of the same item with different batches, you change the batch number by clicking on the Enter key.
Items In Grid Context Menu
- Goto Stock Item...: opens the
[ Stock | Detail | Properties ]screen for the selected stock item. - Goto Sales Order: opens the original sales order the return was created from.
- Goto Customer...: opens the
[ Customer | Detail | General ]screen for the customer linked to the current sales order. - Goto Invoice Manager...: opens the
[ Sales Invoice | Staged Processing ]screen filtering on the return. - Associated Docs:
- Goto Credit Note: opens the associated credit note if it has been created.
- Goto Exchange Doc: opens the return exchange (the sales order for the items being sent out to the customer) if it has been created.
- Goto Supplier Return: opens the supplier return if one has been created.
- Append Extended Description Ctrl+D: will allow a short description to be attached to the stock item line in the sales order, see How To: Add Extended Stock Descriptions.
- Clear Extended Description: this will remove any appended stock item description, see How To: Remove an Extended Description of a Stock Item.
- Apply Value Range: allows the user to specify a value that is to be applied to all of the currently selected rows/items for the current column.
- Clear Selection: deselects the currently selected line(s).
Items Out Grid
The lower grid displays any items the return has been exchanged for (these may not be the same item as the return item, also the customer may not want to receive any exchange items).
Note: when adding items to this grid make sure the checkbox to the left is ticked.
- : used when the return is a direct exchange, i.e. the identical item and quantity is going out to that in the upper grid.
- Stock Values: allows the user to ensure any exchange items are available.
- On Order: the number of the stock item on purchase order.
- In Stock: the number of the stock item in stock.
- Assigned: the number of the stock item assigned to sales orders.
- Available: the number of the stock item available to be sold.
- Back Order: the number of stock items on back order.
- Stock Code: stock code for the item.
- Stock Description: stock description for items to be returned/sent out.
- Qty: quantity of the stock item being sent out.
Items Out Grid Context Menu
- Goto Stock Item...: opens the
[ Stock | Detail | Properties ]screen for the selected stock item. - Goto Customer...: opens the
[ Customer | Detail | General ]screen for the customer linked to the current sales order. - Goto Invoice Manager...: opens the
[ Sales Invoice | Staged Processing ]screen filtering on the return. - Associated Docs:
- Goto Credit Note: opens the associated credit note if it has been created.
- Goto Exchange Doc: opens the return exchange (the sales order for the items being sent out to the customer if it has been created.
- Goto Supplier Return: opens the supplier return if one has been created.
- Append Extended Description Ctrl+D: will allow a short description to be attached to the stock item line in the sales order, see How To: Add Extended Stock Descriptions.
- Clear Extended Description: this will remove any appended stock item description, see How To: Remove an Extended Description of a Stock Item.
- Apply Value Range: allows the user to specify a value that is to be applied to all of the currently selected rows/items for the current column.
- Clear Selection: deselects the currently selected line(s).
Invoicing Sub-tab
The [ Sales Returns | Detail | Invoicing ] sub-tab details the invoice address for the return. Addresses can be dragged and dropped from the grid into the invoice address field.
- Invoice Contact Name dropdown: select a different contact from the existing list.
- Address fields: for the invoice address.
 : is used to create a new Address or Contact.
  : postcode lookup button allows the user to access KhaosControl's Postal Address Finder KPAF/KPAF+database.
This feature is only available if KPAF functionality (additional setup and annual licensing fees apply - email Development for details) is present.
Delivery Sub-tab
The [ Sales Returns | Detail | Delivery ] sub-tab details the invoice address for the return.
Note: addresses can be dragged and dropped from the grid into the invoice address field.
- Invoice Contact Name drop-down: select a different contact from the existing list.
- : add a new delivery contact.
- Address fields: for the invoice address.
- : is used to create a new Address or Contact.
- : postcode lookup button allows the user to access KhaosControl's Postal Address Finder KPAF/KPAF+database .
This feature is only available if KPAF functionality (additional setup and annual licensing fees apply - email Development for details) is present.
Notes Sub-tab
The [ Sales Returns | Detail | Notes ] sub-tab allows the user to record any relevant notes against the return. These are displayed in the return document report (printout) and also by double-clicking on the Note checkbox in the [ Sales Invoice Manager | Staged Processing ] grid.