
Customer Batch Payments Tab
Customer Batch Payments are used for linked customers and allows a single payment from the parent company to be entered to pay for invoices for multiple child (linked) companies. The Customer Batch Payments screen is opened by clicking on the ![]() button in the
button in the [ Customer | Detail | Statement ] screen. The screen consists of two tabs:
The procedure for creating a batch payment is described in How To: Perform a Batch Allocation.
List Tab
The List tab displays previous batches. By default, only those with outstanding invoices are displayed.
List Top Filters
- Show completed batches checkbox: view all batches including those that have been completed.
- Date From and Date To: filter the grid by date range.
List Grid
- Customer Name: the parent company name.
- Batch Ref No: the batch ID number.
- Payment Amt: the amount being paid i.e. the amount on the cheque.
- Items Total: the total amount of all the invoices on the batch.
- Difference: the difference between the amount paid the the total invoice amount.
- Date Received: the date the payment was
- Date Allocated: the date the payment was allocated to the invoices.
- User: the user who allocated the batch payment.
List Grid Context Menu
- Goto HQ Customer: will open the parent company record.
- Clear Selection: deselects the currently selected line(s).
Detail Tab
The Detail tab is where new batch payments are created. The screen consists of the upper action buttons and setup area and the grid.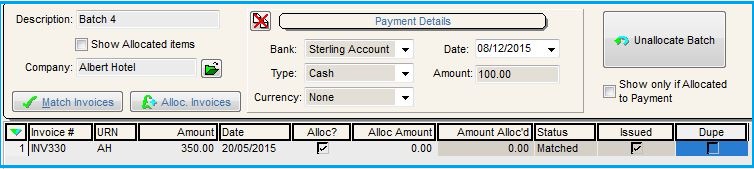
Detail Action Buttons and Setup Area
- Description: the automatically generated batch ID which can be changed.
- Show Allocated Items checkbox:
- Company
 : use the green folder to add the parent link company.
  : once the details have been entered into the grid this button is used to match the invoices with existing invoices linked to the parent company.
 : used to allocated the payment to the invoices listed in the grid.
- Payment Details:
 : clears the payment which will be unallocated although all changes to date will still be posted.
Note: this does not include credit notes.- Bank: the bank the payment is going into.
- Date: the date of the payment.
- Type: the payment type.
- Amount: the total amount, for example the amount on the cheque.
- Currency: the currency of the payment.
Note: you can't mix and match currencies.
 : unallocates any payments that have already been allocated.
- Show only if allocated to payment checkbox: only displays invoices that have been allocated to the payment.
Detail Grid
- Invoice #: the invoice number (Required).
- URN: the URN of the child link customer (Required).
- Amount: the amount of the invoice (Required).
- Date: the date of the invoice.
- Alloc? checkbox: automatically ticked after the button is pressed indicating that the payment is ready to be allocated.
- Alloc Amount: the amount allocated to the invoice.
- Amount Alloc'd: the amount allocated to the invoice after is pressed.
- Status: indicates the current status i.e. Matched, Allocated.
- Issued:
- Dupe:
Detail Grid Context Menu
- Add unallocated Invoices (F8): opens the Unallocated Invoices Lookup allowing the user to select the invoices to add to the grid from the list.
- Apply Value Range: allows the user to specify a value that is to be applied to all of the currently selected rows/items for the current column.
- Clear Selection: deselects the currently selected line(s).