How To: Setup your Shopify Channel
THESE INSTRUCTIONS ARE FOR SETTING UP SHOPIFY USING CHANNELS 1.0 . WE RECOMMEND USING CHANNELS 2.0. See: How To Create a new Shopify Channel
| | Channel Listings is an Advanced User feature. |
Shopify sales orders can be automatically imported into Khaos Control and the shipping notification sent automatically to Shopify to inform the customer that their order has been despatched. In order to integrate your Shopify channel with Khaos Control you will need to email Support to arrange a convenient time to go through the setup with a Support Technician. The steps below are to be carried out after you have created your Shopify account.
Note: Only orders with a status of Paid or Authorised will be imported.
Setup the Shopify Account in Khaos Control
- Open a Web Configuration screen.
- Open the
[ Stock | Channel Setup ]tab. - Press Alt+E or click
 to enter edit mode.
 - Press F3 or click
 to add a new item.
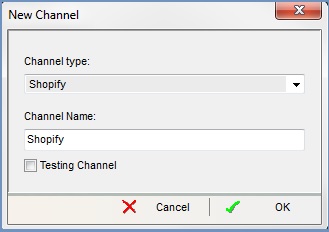
 - Enter the following details in the New Channel dialog:
- Select Shopify from the Type of channel drop down list.
- Name the channel in the Channel Name field, for example Shopify.
- If the Testing Channel checkbox is ticked, untick it.

- Click OK.
- Press Ctrl+S or click
 to save.
 - Open the Categories tab.
- Press Alt+E or click
 to enter edit mode.
 - Press Ctrl+N or click
 .
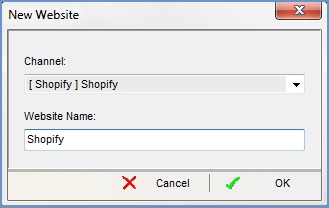
. - Enter the following details in the New Website dialog:
- Select Shopify from the Channel drop down list.
- Name the channel in the Website Name field, for example Shopify.

- Click OK.
- Press Ctrl+S or click
 to save.
Configure your Shopify Channel
- Open a Web Configuration screen.
- Open the
[ Stock | Channel Setup ]tab. - Press Alt+E or click
 to enter edit mode.
 - Focus on the Shopify channel in the upper grid.
- Click on the
 button to open the Credentials Setup dialog.
 - You will need to fill in the following information, this is contained in your Shopify account, see How To: Locate the Setup Shopify Credentials:
- API Key = API Key
- Shared Secret = Shared Secret
- Password = Password
- Base URL = taken from the URL of the page, for example https://shopify2-45.myshopify.com/admin/apps/private/456789 is entered in this field as shopify2-45.myshopify.com.
- Click OK to close the dialog.
- The following information is required to finish setting up the channel:
- Example URL = Order Base URI
- Tick the Notify Customer on Fulfillment.
- Update the Sales Source.
- Update the Company Class.
- The other options can be configured as required but it is advisable to update or add an Ass Ref Prefix so any sales orders are easily identified as Shopify.
- Press Ctrl+S or click
 to save.
Notes
Importing Sales Orders and Shipping Notifications
Both sales order imports and shipping notifications (including consignment references which appear in the customer's shipping email) can be automated, please let the Support Technician know when you are configuring your Shopify channel.
