
Item Grids
Contents
Overview
Grids are displayed on almost every form (screen) in Khaos Control. Examples of grids are:
- Sales Order which allows stock items to be added to the order and specific columns can be edited, for example the discount and quantity of items required.
- Stock List which displays the stock items:

Learning about the power of Grids will greatly enhance your use of Khaos Control.
Data can be easily copied from grids into other applications, such as Excel (depending upon system permission settings).
Editing
Some Grids are permanently read-only whilst others are read-only until the ![]() button is activated or the user presses Alt+E and the form is taken into 'Edit Mode'. It is at this point that the grid can be modified. Once in 'Edit Mode' it is only possible to edit some of the columns, Khaos Control differentiates using the column background; read-only columns are dark grey and editable columns light grey, as in this example:
button is activated or the user presses Alt+E and the form is taken into 'Edit Mode'. It is at this point that the grid can be modified. Once in 'Edit Mode' it is only possible to edit some of the columns, Khaos Control differentiates using the column background; read-only columns are dark grey and editable columns light grey, as in this example:

Grid Configuration
Grid Configuration allows you to customise the grids in Khaos Control in the following ways:
- Hiding Columns.
- Re-positioning Columns
- Making Columns Read-only.
Grid Configuration is an Admin-only function and grids can be configured by individual user or by user profile.
The dialog for configuring grids, Grid Profiles is accessed from the grid menu ![]() by clicking on 'Configure Grid'.
by clicking on 'Configure Grid'.
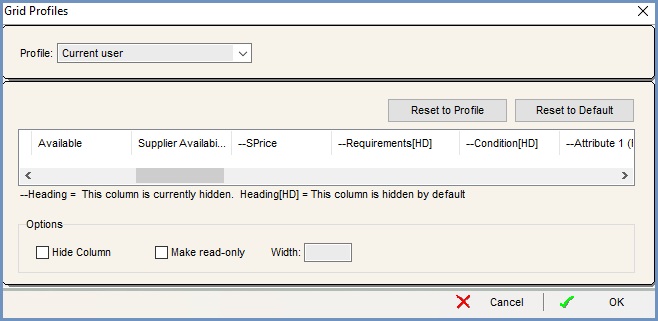
The dialog consists of:
- Edit Profile For: here you can select whether the grid profile is to be applied to the current user or users belonging to a specified user profile.
- Reset to Profile: when this button is clicked, the grid profile will reset to the grid profile specified for the current user's user profile.
- Reset to Default: when this button is clicked, the grid profile will reset to the system default.
- Grid Area: shows the columns from the grid currently being viewed in Khaos Control. Columns can be selected here for configuration.
- Hide Column: this checkbox
 is used to hide columns selected in the Grid Area.
 - Make read-only: this checkbox is used to make columns selected in the Grid Area read-only .
When a user's grid has been configured, it will load with an orange background in the grid header to make it clear that the grid has been modified:

More information about how to use Grid Configuration can be found on the following pages:
- How To: Hide Columns in a Grid.
- How To: Make Grid Columns Read-Only.
- How To: Re-Position Columns in a Grid.
Selecting and Deselecting lines in a Grid
Selecting
Lines within a grid may need to be green-selected in order to carry out an action on the line. To select an line on a Grid:
- Hold down the Ctrl key and left-click on the item; or
- Using the keyboard, navigate to the correct item on the Grid using the arrow keys. Hold down the Shift key and press the Up/Down Arrow key to select the line; or
- Press down on the mouse wheel (between the left and right mouse buttons).

Multi-Selecting
Grids allow multiple items to be green-selected.
Contiguous Range
To select a contiguous range of items:
- Hold down the Shift key and left-click on the item to complete the range; or
- Using the keyboard, hold down the Shift key and use the Up and Down Arrow keys to complete the range.

Non-Contiguous Range
To select a non-contiguous range of items:
- Hold down the Ctrl key and left-click on the item to select; or
- Press down on the mouse wheel (between the left and right mouse buttons) on each item to be selected.

Select Rows by Reference
Items within a grid that contain the same value can be selected by focusing in one of the cells containing the value and pressing Ctrl+ Shift+R.
Select All
To select ALL the items in the grid press Ctrl+A. If items are already selected, Ctrl+A will invert the selection.
Deselecting
There are different options to deselect the green-selected lines in a grid depending on whether you wish to deselect single, multiple or all lines:
- Deselect single lines:
- ctrl + click on a green-selected line will deselect it; or
- Using the keyboard, navigate to the item to be deselected using the Arrow keys, hold down the Shift key and use the up or down arrows to deselect the item.
- Deselect all green-selected lines in the grid:
- Right-click on the Grid and select Clear Selection from the grid's right-click Context Menu, which will deselect all green-selected lines; or
- Hold down Ctrl+ Shift+X to deselect all lines.
Searching and Sorting
Sorting
Each column may be sorted or ordered by clicking on the column heading:
- Ascending:
- Clicking with the left mouse button sorts the column in ascending order; or
- Press Ctrl+D.
- Descending:
- Clicking with the right mouse button sorts in descending order; or
- Pressing Ctrl+U.
Multiple columns may be sorted; hold down the Shift key and click on the required column headings, the columns are sorted in the order they were selected.
To clear a sort, click in the top-left corner of the Grid and select the reset command. To perform this action with the keyboard, hold down Ctrl+E.
Searching
To search for a value within a Grid either:
- Press Ctrl+F and enter the search value in the lookup, press ok. To find the next instance press ctrl+ Shift+N, using this method will also green-select all occurrences that match the search criteria; or
- Focus in the column and begin typing; the cursor moves to the closest match. By continuing to type, the search will focus in on the item until it is located. If the value entered is not contained in the Grid, the column's heading will turn red; until then the column's heading will remain green (as below).

Menus
Context Menus
Right-clicking on an area of the Grid with the mouse (or pressing Alt+F10) will display a menu from which different selections can be made. The menu is context sensitive and will display commands according to the area the mouse is over. These menus usually contain a number of 'Goto' options to open other forms to assist with the current task. Double-clicking on a Grid will normally activate the first item on the Context Menu.
Two common Grid Context Menu options are:
- Clear Selection: deselects the currently selected line(s).
- Apply Value Range: allows the user to specify a value that is to be applied to all of the currently selected rows/items for the current column; this also applies to Lookup columns (see below). For example, to change the quantity of several items on a Sales Order select the required item lines, right-click and select 'Apply Value Range', typing in the required quantity. Only available when the Grid is editable.
Lookup Columns 
Some columns have an ![]() icon in the column heading to lookup information. When the column is selected, the lookup button, F4 Function Key or Alt + Down Arrow can be used to activate a lookup box from which values may be selected. Pressing any key whilst the column is selected also activates the lookup box.
icon in the column heading to lookup information. When the column is selected, the lookup button, F4 Function Key or Alt + Down Arrow can be used to activate a lookup box from which values may be selected. Pressing any key whilst the column is selected also activates the lookup box.
Grid Menu 
A Grid Menu is available in the top-left corner of any Grid. The following commands are available:
- Reset: removes any sort order and/or grouping previously applied and refreshes the screen. This also clears any selections that have been made. The keyboard short cut is Ctrl+E.
- Resize Column: allows users to change the width of the column the user is currently focused in.
Notes:- This feature is not available in certain grids.
- Grid columns will auto resize based on data contained, this can be stopped if required email Development.
- Sort Descending: this sorts the column the user is currently focused in an descending alpha-numeric order. For example Z,Y,X,W,V~5,4,3,2,1. The keyboard short cut is Ctrl+U.
- Sort Ascending: this sorts the column the user is currently focused in an ascending alpha-numeric order. For example 1,2,3,4,5~A,B,C,D,E. The keyboard short cut is Ctrl+D.
- Total or Average Column: used to total or average numeric the column the user is currently focused in. A message box appears showing the total value or average value. The keyboard shortcut for Totalling a column is Ctrl+T and to get an Average value is Ctrl+Q.
- Find: use the Find Ctrl+F command to find a specific value within the column the user is currently focused in.
Note: this does not support Wildcard Characters(%). - Find Next: the Find Next Ctrl+ Shift+N command looks for the next occurrence of the Find value until there is no longer a match.
- Search: use the Search Ctrl+ Shift+S command to find a specific value within any column within the Grid.
Note: this does not support Wildcard Characters(%). - Print Grid: allows the user to display a report listing the information in the grid. The information from the grid can be displayed according the user's requirements. Once the report is displayed it can then be printed or converted into a pdf, for more information see Print Grid. The Print Grid option is available from any grid within Khaos Control.
- Send to Notepad: sends all or only selected data in the Grid to Notepad for saving to external files, printing or importing into a spreadsheet program, see Send to Notepad.
Notes:- When sending to Notepad, it is important to ensure Notepad does not have 'Word Wrap' enabled (Edit, Word Wrap) or the Grid will not display correctly.
- When importing into a spreadsheet package, such as MS Excel, it is important to specify each column to be separated by a TAB delimiter and that Excel should 'Treat consecutive delimiters as one'.
- The results can be sent directly to Excel by saving the file as a .csv export rather than saving the file as a text file and then importing it into Excel.
- When exporting, select the columns to be included or excluded from the exported file, using the popup form.
- Tools:
- Select...: allows the user to select rows of records by reference, percentage of the grid or by a set number of rows from various points within the grid, see Select.
- Graph...: allows the user to create a line or bar chart graph to analyse information for selected values in the grid, see Graph.
- Count Selected: counts the number of rows that are green-selected, see Count Selected.
- Show Distinct Values: these are values that may be in a list more than once, but when using distinct values will only be returned once in the results; for example, if you reported on sales made by retail customers and Rita Richards bought from you five times during the period being reported on, in the results she would only appear once.
- Data Analysis: allows users to analyse data between selected dates broken down into Day, Week, Month or Yearly periods, see Data Analysis. It is available in the following screens in Sales Summary:
- Add to Dash: used for setting up KPI Dashboards, see KPI Dashboard
- Group Grid: some Grids within the system support the grouping function; those that cannot will not display the Group command, see Grouping in Grids. Grouping may be performed on date (by month) or text columns. Totals are inserted for each numeric column in the Grid. When a Grid has been grouped a printout may be obtained in the usual way. The keyboard shortcut is Ctrl+G. To remove the grouping, select 'reset' from the Grid Menu or press Ctrl+E.
- Configure Grid: opens the dialog used for configuring the grid. See Grid Configuration
Grid Totals
Some screens display total boxes at the bottom of a Grid. By right clicking on these totals the following options are displayed:
- Set Decimal Places (default=two): allows the user to enter the number of decimal places the totals are displayed with.
- Show Totals (default): shows the totals rather than the average value, where appropriate (e.g. unit price columns will always show averages, because totalling such columns would be meaningless).
- Show Averages: shows the average rather than the totals. When displaying averages, the background of each cell appears shaded; this can particularly be seen on the Sales Order screen's grid, where some columns (e.g. 'Gross Unit Price') always display as averages.
- Hide Currencies: if there are multiple currencies displayed in a grid, the currency symbol will be shown adjacent to the value. The Hide Currencies option will remove the currency symbol.
Note: if there are multiple currencies displayed in the grid the background colour of the grid totals will be orange. - Toggle Totals on/off (default=on): the totals are displayed at the bottom of the grid.
- Number Store: the number store allows users to store numbers and compare them, see Number Store.
Note: double-clicking on a total box opens the Number Store dialog.