How To: Setup and Use CIS Reverse Charge VAT
CIS Domestic Reverse Charge VAT has been added into the system for both customers and suppliers, see HMRC Check when you must use the VAT reverse charge for building and construction services.
Customers
When Reverse VAT is enabled against a customer, all VAT within the sales order will be removed and shown within the invoice to the customer as:
- Reverse charge: The customer is to pay the VAT to HMRC (and the value of the VAT stated).
Any credit notes which are raised against an order with Reverse VAT enabled, need to omit VAT and the credit note document should read:
- Reverse charge: Customer to account for output adjustment vat to HMRC (Value of VAT stated).
For SP Ledger postings include a Reverse VAT option, which is linked to the option on the customer record. When the posting has been done, the SP ledger entry should reflect the reverse VAT, this should be shown within the "Reverse VAT Total" column on the SP Ledger screen.
Note: The amount of Reverse VAT for customers does not need to be recorded on the VAT Return.
Enable Reverse VAT for Customers
To enable Reverse VAT against a customer record:
- Open a Customer screen.
- Load the required customer record.
- Press Alt+E or click
 to enter edit mode.
 - In the Options area of the
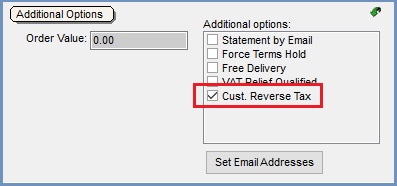
[ Customer | General ]tab, click on the to toggle between the basic Options panel and the Additional Options panel.
 - Tick the Reverse VAT checkbox.

- Press Ctrl+S or click
 to save.
Sales Order
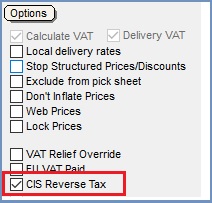
When a customer has the Cust Reverse VAT option ticked in their record, the [ Sales Order | Detail | Additional ] tab will have the CIS Reverse Tax checkbox ticked by default:
Notes:
- The user can override this on the Sales Order by unticking it.
- When printing an invoice it will include the text to indicate how much VAT needs to be paid to HMRC by the customer.
- No tax values will appear on the sales order itself.
- When printing an invoice, it will include the text indication how much VAT needs to be paid to HMRC by the customer, Reverse Charge: Customer to pay the VAT to HMRC (£8.76).
- When the invoice is issued, no postings will be made to the accounts relating to the VAT and will not appear on the UK Tax Return.
Customer Credit Notes/Exchanges
These have 'CIS Reverse Tax' set based upon the original sales order and customer settings.
Basic Reports
Basic Reports can be updated with the with the field:
calc_reverse_tax_declaration
This will appear on invoices with a reverse tax element as:
Reverse Charge: Customer to pay the VAT to HMRC (£28.67)
For credit notes, the text will appear as:
Reverse Charge: Customer to account for output adjustment VAT to HMRC (£8.70)
Suppliers
When Reverse VAT is enabled against a supplier:
- The VAT calculations on purchase orders will be omitted and the purchase order will state:
Reverse charge: Customer to pay vat to HMRC (Value of vat inserted). - SP Ledger postings will be amended to include a Reverse VAT option, which is linked to the option on the supplier record. When the posting has been done, the SP ledger entry should reflect the reverse VAT, this should be shown within the "Reverse VAT Total" column on the SP Ledger screen.
- The Reverse VAT will be accrued for suppliers and entered onto the VAT return, quarterly. The "Reverse VAT" value would need to be entered in Box 1 output tax and Box 4 input tax of the VAT Return. This would then be included in the digital VAT return posting via MTD.
Enable Reverse VAT for Suppliers
To enable Reverse VAT against a supplier record:
- Open a Supplier screen.
- Load the required supplier record.
- Press Alt+E or click
 to enter edit mode.
 - In the Options area of the
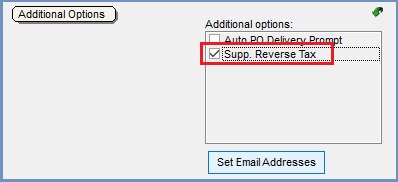
[ Supplier | General ]tab, click on the to toggle between the basic Options panel and the Additional Options panel.
 - Tick the Supp. Reverse Tax checkbox.

- Press Ctrl+S or click
 to save.
Purchase Orders
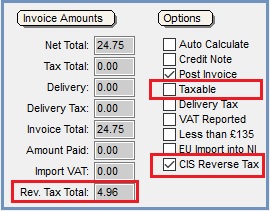
When a Purchase Invoice is created from a Purchase Order or Delivery Note for a supplier who has the Supp. Reverse Tax option enabled, the Purchase Invoice will have:
- The 'CIS Reverse Tax' option ticked.
- The 'Taxable' option unticked.
- The value of the 'Reverse Tax'.
Note: This value can be amended.

When the invoice is posted, there are matching Credit and Debit entries for the reverse Tax in the accounts and UK Tax Return.
SP Ledger Postings for Customers and Suppliers
On the [ Accounts | SP Ledger ] screen there are two options:
- Reverse Tax: the amount of reverse tax and is automatically calculated when a Net or Gross amount is added against the entry.
- CIS Reverse Tax: will be automatically ticked if the customer/supplier selected has the 'Cust. Reverse Tax' ticked in their record.
Note: If the 'Cust. Reverse Tax' is unticked against the customer/supplier, then the SP Ledger will act as it did before this functionality was enabled, and the CIS Reverse Tax checkbox will be unticked. It is possible to tick the CIS Reverse Tax manually in the SP Ledger, but Khaos Control will not allow the entry to be saved.
Method
- Open the
[ Accounts | SP Ledger ]tab. - Press Alt+E or click
 to enter edit mode.
 - Press F3 or click
 to add a new item.
 - Use the Lookup dialog box to locate the customer/supplier that you wish to post an invoice transaction against.
Notes:- The supplier checkbox is used to toggle between customers and suppliers.
- The customer or supplier must have the Cust. Reverse Tax or Supp. Reverse Tax ticked in their record as explained above.
- A new row is added to the grid for the selected customer/supplier.
- Enter the appropriate details, for example S/P, InvRef, date etc.
- Enter an amount in the Net column, the Gross column is automatically populated with the same value as Net, the Tax value remains 0, and the Reverse Tax is updated with the correct taxable amount.
- Press Ctrl+S or click
 to save the transaction once you have added all the details.
 - Acknowledge the message to confirm that you are intending to post a Reverse Tax SP Ledger and then click OK to post the entry to the accounts:

