How To: Create a New Marketing User
Overview
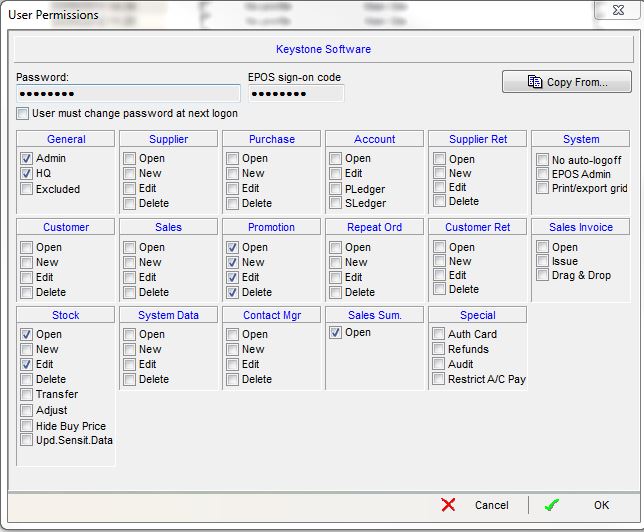
When creating a new user with a specific role, it is necessary to define both permissions (what they can do) and a profile (what they can see). Here is an exemplar of how a new Marketing User might be created and set up. As a rule, it is best to start by setting permissions and access to the minimum levels possible for the role in question. Extra permissions and access can then be enabled if and when required. In this scenario our Marketing User permissions have been largely limited to promotions, stock and sales summary functions. The sale summary screen would need to be accessed to measure the success of marketing initiatives and the user may need to edit the stock screen to set up price breaks, etc.. Although web config functionality is not shown in the stock section, it can be enabled when setting up a Marketing profile.
Creating New User
- Open a System Data screen.
- Double click on
[ Others | Users ]. - Press Alt+E or click
 to enter edit mode.
 - Press F3 or click
 to add a new item.
 - Enter the details of the new user (see Users for a description of the grid columns).
- Press Ctrl+S or click
 to save the new user.
Setting User Permissions
- Select User Permissions from the right-click context menu and set these as required.
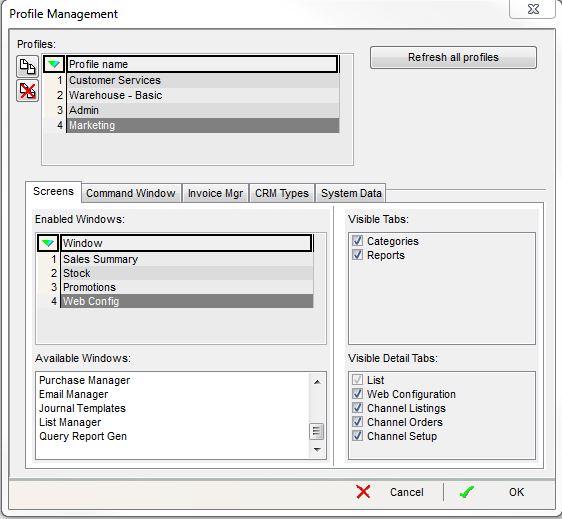
Below is a screenshot of typical settings that might be used for a Marketing User - these may need to be adjusted to suit specific business requirements, for instance:
- In some circumstances, it may be desirable to allow a Marketing User to see and edit the Supplier screen (to set up Supplier discounts for example).
- Contact Manager may be enabled, although mailshots can be organised from the List Manager, accessed via the Sales Summary screen.
Creating User Profiles
- Right click on the grid and select 'Define Profiles'.
- Select 'Yes' to the information dialog displayed.
- Click on
 to add a blank profile to the bottom of the Profiles grid.
 - In the Profile Management dialog add a name for the profile and select it.
- In the Screens' tab, drag and drop screens required for the profile from the Available Windows grid into the Enabled Windows grid.
- Untick the Visible Tabs and Visible Detail Tabs that are not required for the profile for every enabled screen.
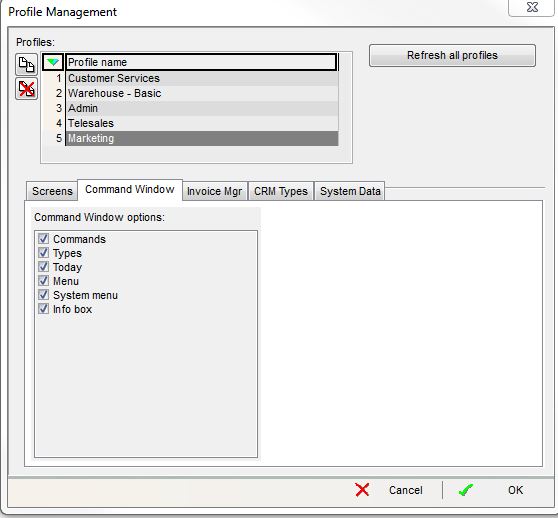
- In the Command Window tab, check the Command Window options that are required for the profile.
- In the Invoice Mgr tab, check the stages that are required for the profile.
- In the CRM Types Tab check all the CRM Types that will be blocked for this profile.
- Click on 'OK'.
Below are screenshots of typical settings that might be used for a Marketing User - these may need to be adjusted to suit specific business requirements. Note how the Web Config screen has been added to this user's profile, enabling them to edit web listings for marketing purposes.