
Purchase Order Tab
Contents
Purchase Order Tab Overview
There are two interpretations of the purchase order's role:
- The first is the traditional interpretation of the purchase order's function - the document that you raise to your supplier which tells them that you would like to order items from them on account. You then print the purchase order report form and email it or send it to your supplier. Your supplier then uses the reference that you have supplied on your purchase order when they invoice you.
- The second is raising a purchase order when the document itself is not required, since you are ordering from a supplier that requires up-front payment or you are purchasing from a retail outlet. For example, if you walked into Staples to purchase some office stationery with your credit card, there would be little point sending a purchase order to Staples as it was not an account purchase. You would, however, raise an internal purchase order to show that you have purchased these items, so that the transaction is recorded against your credit card account and the tax (in the UK - VAT) is recorded in the account summary. Purchases of this type are pre-paid so it is applicable to check the 'pre-paid' check box. This will generate a payment that will allocate to the purchase invoice, balancing your accounts.
For a visual guide of where the purchase order fits into the purchasing process and where purchase orders can be created from see the Purchasing Process.
The 'Purchase Order' tab consists of the 'Purchase Order' grid and two sub-tabs:
Purchase Order Main Tab
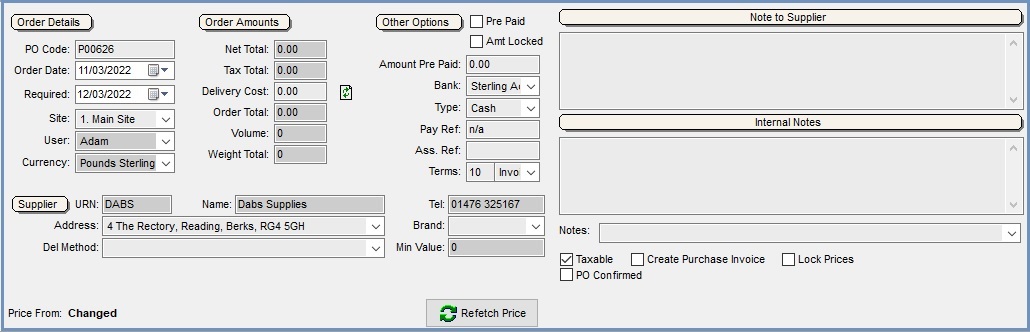
Order Details
- PO Code: generated by the system automatically. Can be overwritten by the user. Prefix letters can be set in System Values.
Note: when renaming PO Codes ensure that no special characters are used. Characters permitted are alphanumeric, hyphen and underscore. eg. PO_SUPP_15-11-17 is ok, PO_SUPP_15/11/17 will cause failures of PO email generation. - Order Date: date purchase order was created. This date can be changed if required.
- Required: date items on the purchase order are required by.
Note: by default this value is set to the following day. If this value is altered when creating a purchase order it will override the due dates as set per item in the grid. - Site: stock control site the items are going to be booked into. The site address is selected on the
[ Delivery Address ]sub tab by ticking the Deliver To Site checkbox. This can be changed on the Delivery Note if required. - User: the logged in user who created the purchase order.
Note: this cannot be changed. - Currency: the currency used in the Purchase Order (The Supplier's currency).
Order Amounts
- Net Total: net total of all items on the purchase order.
- VAT Total: VAT total of all items on the purchase order " will only change if changes are made to the 'Tax' column in the grid.
- Delivery Cost: the Net cost of delivering the goods. This can be predefined by populating the Del Chg field on the
[ Supplier | Details | General ]tab.
Note: the amount can be overridden by the user. - Order Total: sum of 'Net Total', 'VAT Total' and 'Delivery Cost'. VAT element of the delivery cost will be added to the 'VAT Total'.
- Volume: the total volume of all the products in the grid taken from the Volume set against the stock items in their
[ Stock | Detail | Properties ]tab. - Weight Total: the total weight of all the products in the grid taken from the Average Weight set against the stock items in their
[ Stock | Detail | Properties ]tab.
Other Options
- Pre Paid: can be ticked if order has already been paid for (i.e. the purchase order has to be paid up front before the items are despatched). This is only editable when the Amt Locked checkbox is unticked. It is posible to part pay invoices, see How To: Part-pay for a Purchase Order.
- Amt Locked: if unticked then the purchase order can be part-paid.
- Amount Pre Paid: the amount that is being paid up front, if it's not the total amount, see How To: Part-pay for a Purchase Order.
- Bank: the 'Bank Account' to be used to pay for the purchase order if the 'Pre-Paid' tick-box is flagged.
- Type: the payment type is recorded against the payment transaction if the 'Pre-Paid' tick-box is flagged.
- Pay Ref: free text field allowing the user to record a payment reference if required. This field has a maximum of 15 characters.
- Ass Ref: used to record any user definable value to relating to the order.
- Terms: your terms with your supplier setup in their
[ Supplier | Details | Financial ]tab.
Notes Area
- Note to Supplier: notes are displayed at the bottom of the purchase order report when it is printed.
- Internal Note (max 1000 characters) : is usually for internal notes, although they can be added to Basic Reports.
- Default Notes: default notes can be added from the drop down list, to setup default notes see Examples of creating Default Notes.
The four checkboxes are:
- Taxable: if not ticked then taxable items will calculate as non-taxable.
- Create Purchase Invoice: not normally ticked by default. This setting is found in
[ System Values | Accounts | General | Purchases ]. This option will generate purchase invoices from either purchase orders (ticked) or delivery notes (unticked). - Lock Prices:
- TICKED: the Grs Unit and Net Unit Price fields are locked in the Purchase Order and cannot be edited after the initial save. If the prices require editing then untick this checkbox.
- UNTICKED: the Grs Unit and Net Unit Price fields are can be edited even after the purchase order has been saved.
Notes:- The Supplier's Buy Price and/or Stock Buy Price will still be updated if the options Update stock buy price when saving purchase order and Update supplier buy price when saving purchase order in
[ System Values | Purchasing | General and Pricing | General ]are ticked. - Discount percentages and amounts can still be entered against the item regardless of the setting.
- The Supplier's Buy Price and/or Stock Buy Price will still be updated if the options Update stock buy price when saving purchase order and Update supplier buy price when saving purchase order in
- PO Confirmed: allows the user to indicate whether the purchase order has been confirmed and doesn't actually do anything other than record the fact.
Supplier
- URN: suppliers URN.
- Name: name of supplier.
- Tel: telephone number of supplier.
- Address: supplier address.
Note: address can be changed using the drop-down menu if there are multiple supplier sites. - Brand: a brand can be selected so the items being ordered can be 'branded', see How To: Setup Branding.
- Min Value: the minimum purchase order value (excluding delivery) which is setup per individual supplier, see How To: Setup and Use Minimum Purchase Order Value.
Note: if set to '0.00' (default) then no - Del Method: these options can be set by the user in
[ System Data | Supplier Delivery Method ](e.g. could be set to type of vehicle to indicate special unloading bay must be available).
minimum is set.
- Price From: indicates where the price has come from for example Supplier Price, Price List or Stock Buy Price.
 : this sets the price back to the value the system has calculated that it should be for the line currently focused on.
Purchase Order Grid
- Stock:
- Code: the item's stock code.
- Description: description of stock item.
- Quantity:
- Ordered: quantity required of each item.
Note: if the quantity ordered is not a multiple of the reorder multiple then the background of this cell will be fuchsia. - x Qty: the ((PO Item Qty / Reorder Multiple) rounded up) x Reorder Multiple (from
[ Stock | Detail | Properties ]). If the quantity ordered is not divisible by the Reorder Multiple then it will be highlighted.
Note: amending the Reorder Multiple against the stock item will change all current and historic Purchase Orders, Delivery Notes and Purchase Invoices immediately. - Delivered: quantity delivered of each item. This field is read-only. It is useful when looking at pre-existing purchase orders. If the field is highlighted it indicates that a quantity of the item has been marked as Final Delivery in the On Order screen.
- Ordered: quantity required of each item.
- Prices:
- Grs Unit: gross cost, per unit (i.e. Net + VAT).
Note: If you have your purchase system set to use gross prices, the purchase price from a supplier should be configured as gross (i.e. including VAT), even where the supplier is not subject to VAT (e.g. based in USA). - Net Unit: net cost, per unit.
- Disc%: different discounts can be applied to each purchase order line. The 'Disc%' column displays the discount as a percentage and any quantity entered here will automatically populate the corresponding 'Disc£' column.
- Disc L: displays the discount as a value and any quantity entered here will automatically populate the corresponding Disc% column.
- Net Tot: total net cost in £'s of items on the order line.
- Tax: total VAT cost in £'s on the order line.
- Grs Tot: total gross cost (net + VAT) in £'s* of the order line.
- Grs Unit: gross cost, per unit (i.e. Net + VAT).
- Due:
- Due Date: calculated by stock items lead time in days which do not take into account weekends and non-working days. Can be overwritten if the 'Required' date is changed in 'Order Details' at the top of the screen, or by typing directly into the grid.
- Time: can be used if the user requires the order to be delivered at a specific time.
- Status: the current status of the item, for example on the water, shipped, being manufactured, held in bond etc. A status can be set by focusing on the field in the grid and pressing F4 or by using the Context Menu on the On Order tab. For more information, please see How To: Change the Status of an Purchase Order Line.
Note: there is an option to add another column called Status using the Grid Configuration, but this column is not editable. - Consigned (this option is only visible when the Consignments functionality is enabled): this is ticked when the stock item has been added to a consignment.
- Volume: displays the volume of the item calculated from the
[ Stock | Detail | Properties ]screen. - Supplier Ref: displays any value entered into the Supplier Ref field in the
[ Stock | Detail | Suppliers ]screen.
The following columns can be added into the grid using Grid Configuration. They are hidden by default. Please see Grid Configuration for more details:
- Status: the current status of the item, for example on the water, shipped, being manufactured, held in bond etc. This column is not editable unlike the default status column above..
- Other Ref: this displays the information held in the Other Ref field in the
[ Stock | Detail | Properties ]screen. - For Internal Use: a free text field so that the user can make notes against stock items on the purchase order.
Note: Rows in the Purchase Order grid having a green background have supplier quantity price breaks set up against them in the [ Supplier | Supplier Price List ] screen:
Purchase Order Grid Totals
Whilst the Grid Totals row can be set to display either Averages or Totals for most columns in the grid, the "Grs Unit" and "Net Unit" columns will always display averages.
Purchase Order Grid Context Menu
- Goto Stock Item: opens the stock detail page for the item the user is currently focused on.
- Goto Supplier: opens the supplier screen.
- Goto Delivery Note: opens the delivery note for the purchase order (if it has been delivered).
- Goto Purchase Invoice: opens the purchase invoice linked to that purchase order.
- Goto Purchase Manager: opens the purchase manager filtered on the purchase order.
- Goto GRN (this option is only visible when Warehouse Control is enabled): this will take you to the associated GRN if one has been created for the purchase order.
- Goto Consignment (this option is only visible when the Consignments functionality is enabled): this will take you to the associated consignment if the order was part of that consignment.
- Goto Associated Sales Order: allows the user to view any back order sales orders associated with the current purchase order.
Notes:- If there is only one sales order associated with the purchase order it will be opened.
- If there is more than one sales order associated with the current purchase order the Please choose an Associated Sales Order dialog is displayed listing all sales orders associated with the current purchase order. Double clicking on one of the orders will load it.
- If there are no associated sales orders nothing will happen.
- Append Extended Description: add an extended description to the stock item the user is currently focused on.
- Clear Extended Description: remove the extended description from the stock item the user is currently focused on.
- Quick Stock Entry: opens the quick stock entry dialog box to allow users to quickly enter stock codes.
- View Past Prices: view prices previously paid for the stock item selected.
- View Supplier Qty Breaks: opens a dialog displaying the quantity price breaks as set up in the
[ Supplier Price Lists | Supplier/Stock (1) ]screen for the item currently focused on, or multiple items green-selected. The date range the price breaks are valid for and if the item is discontinued are also displayed. - Create Delivery Note: create delivery note for the purchase order.
- Create GRN (this option is only visible when Warehouse Control is enabled): creates a Goods Received Note (GRN) for the items on the purchase order.
- Back Order:
- View Associations: displays the Back Order Associations dialog allowing the user to view, and if required break, the association with stock items on a sales order, see How To: Break the Association between a Sales Order and Back Order/Purchase Order.
- Edit Associations: opens up the Back Order Associations dialog showing Sales Orders associated with this Purchase Order and allows you to remove the association.
- Create Associations: displays the Sales Order Items dialog allowing the user to create an association with a sales order, you can even create associations between multiple stock items and multiple sales orders, see How To: Create an Association between a Sales Order and Back Order/Purchase Order.
- Exclude from History: excludes items from the supplier's purchase order item history from being automatically added to any future purchase orders. This is only visible when the Add past items to Sales / Purchase Orders option found in
[ System Values | Sales | Order Display ]is enabled. - Print Stock Labels: enables the user to print stock labels for selected items on the purchase order.
- Print Stock Labels (BasicReports): enables the user to print stock label for selected items on the purchase order using Basic Report Labels if setup.
- Colour Legend: opens the colour legend popup.
- Quantity Price Break: if a quantity price break has been set against the stock item the system will always display a green highlight. This functionality does not work how it does on a Sales Order where the green highlight only appears when the order quantity is within 10% of the next pricing band.
- Pack Header: highlights the pack header line.
- Order Multiple Check: highlights the purchase quantity if it is not an exact multiple of a reorder multiple if it has been setup.
- Final Delivery: highlights an item that has been marked as Final Delivery.
- Apply Value Range: allows the user to specify a value that is to be applied to all of the currently selected rows/items for the current column.
- Clear Selection: deselects the currently selected line(s).
Purchase Order Delivery Address Tab
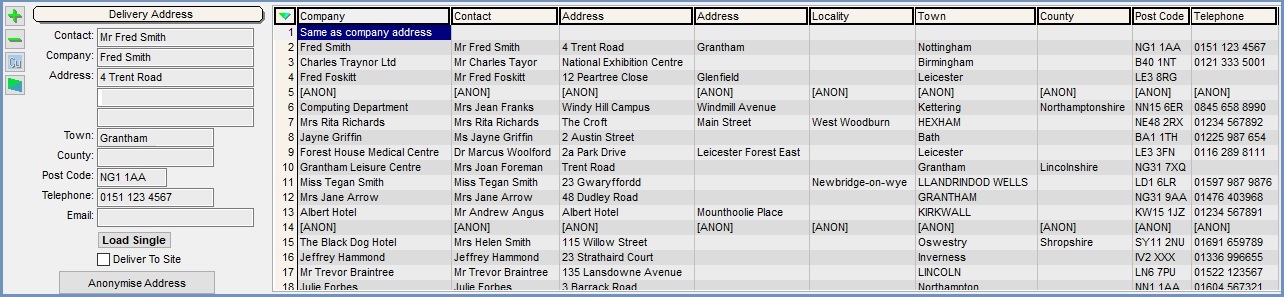
The delivery address tab controls where a purchase order will be delivered to. If the item on the purchase order is a drop ship item, addresses in the grid can be dragged and dropped into the delivery address field when in edit mode. The tab consists of the Delivery Address area and the address grid listing addresses.
 button: used to create a new address.
 button: used to delete an addresses focused on in the grid.
  button: displays the 'Company/Contact Assignment' dialog box allowing the user to use the F8 key to lookup and add a current customer's delivery details if they are not present in the grid (i.e. they have not had a drop ship item before).
 button: toggle between the main delivery address and direct dropship address. The latter is only possible if all the Purchase Order items have backorder associated Sales Order Items, all for the same delivery address and contact.
 and
and  : will only load the address it is assigned by default, speeding up open process where lots of addresses are present. All the addresses can be displayed by pressing the button but this may slow down your system if there are a large number of addresses.
- Deliver To Site checkbox (default=unticked): when ticked the address details will be set to the Address details of the site which is currently selected in the 'Site' drop-down on
[ Purchase Order | Purchase Order | Main ]screen. Whilst this flag is active, the Address fields of the Purchase Order will be non-editable.  : Permanently anonymises a customer's address data.
Notes:
- By default the address will be Same as Company Address unless you have created a BO/PO in which case it will be the customer's address. If you change the default address a warning will be displayed and the user will need to acknowledge the changes and confirm before saving the purchase order. Changing the default address will affect all purchase orders that use it, even those that have been delivered.
- The Company Site Address can't be edited from the Purchase Order.