
How To: Add the EC Number into the Customs Invoice
- WARNING: Before making changes to ANY of your Basic Report templates it is advisable to take a backup.
| | Basic Reports is an Advanced User feature. |
Your EC Number as defined in [ System Values | General | Your Company ] can be shown in Customs Invoices. It is going to be added iat the bottom of the report.
- Follow the menu route
[ System Operations | Basic Reports Setup ]to open the "Basic Reports Setup" dialog. - From the dialog's
[ Reports List ]tab, double-click on "Customs Invoice Report". - Focus on the Brand and then click on the
 button to edit the Customs Invoice's report template using Report Builder Designer.
Note: you can save the current layout with a new name so that you don't affect the invoice layout as you are updating it. It also means that you have a backup. To do this select Save As... from the file menu. - Click on the
 in the top left toolbar.
 - Click in the bottom area of the report and position and resize the Label using the handles (the circles at the sides and corners).:
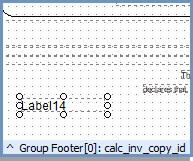
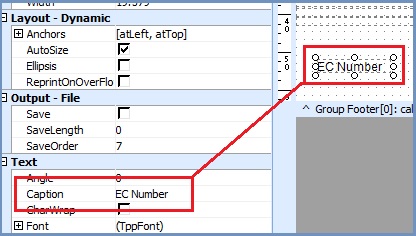
- Make sure this label field is selected and in the Text section on the left, enter the caption EC Number.
- Click on the DBMemo
 button on the top menu.
 - Click to the right of the label you have just added and position and resize the DBMemo field using the handles.
- Make sure the DBMemo field is selected.
- In the top right select jitSystemValues from the dropdown list.
- In the adjacent dropdown select EC_Number, you will see your EC Number is now displayed if it has been added in
[ System Values | General | Your Company ]:
- If you are happy with the layout, save what you have done by going to File -> Save.
- Test the layout and make any adjustments as required.
See Also
- System Operations - Basic Reports Setup
- Report Builder Designer
- Basic Reports - Available Data Fields